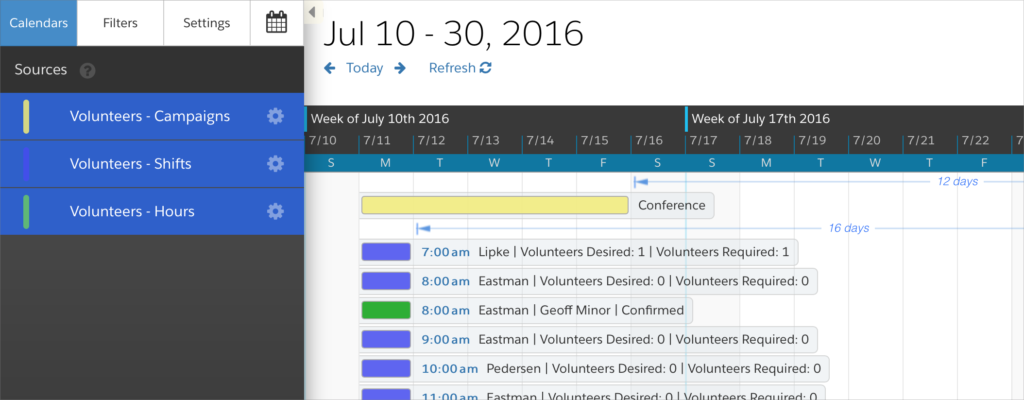
With DayBack Calendar, you can visualize the Campaigns, Shifts, and Hours in the Volunteers application and make changes right from within the calendar.
DayBack Calendar has been on the Salesforce AppExchange for a few months now, and a common question we are getting from customers is can we integrate DayBack with other Salesforce apps to improve/extend those apps’ scheduling capabilities. In general, Salesforce apps are packages that have most of their components locked, so they can’t be modified after being installed. However, not everything in the package is locked, so there are some opportunities for integration.
Integrating DayBack Calendar With Volunteers For Salesforce
 One of these apps Salesforce customers have been asking us about is Volunteers For Salesforce, a popular app for non-profits to manage and track volunteers donating their time.
This app works with Jobs, which are part of a Campaign. Each Job contains Shifts which designate when and how many volunteers are needed. Hours are then used to connect a Shift with a specific volunteer (Contact), and record how many hours the volunteer donated. It’s a powerful tool as it also allows for integration into the non-profit’s web page where it provides a portal for the volunteers to see what shifts are available and to sign up for them.
We were introduced to the volunteers app by Sergey Erlikh from Manifesta Foundation where he helps them make the best use of Salesforce. He specializes in customizing the Volunteers app and is a great resource if you’d like to get practical advice about implementing volunteer scheduling in your org.
Adding DayBack
The Volunteers app comes with a simple, read-only calendar for displaying Shifts, but we also wanted to show Hours and allow the user to make edits right from the calendar. DayBack Calendar can map to any Salesforce Object with Dates or Date Times. We’ll start with mapping Shifts.
Shifts
Volunteers Shifts has a field for the Start Date Time, but it doesn’t have a field for the End Date Time. Instead, it has a Duration field where you can enter the number of hours and infer the End Time. DayBack, however, uses an explicit End value and doesn’t currently provide a mapping for Duration. Fortunately, adding new fields to a Custom Object is one of the things not locked down in a Managed Package, so we can add a new field to the Shifts Custom Object for the End Date Time. We now need a way to keep the Duration field and our new End Date Time field in sync. For this we can turn to Workflow Rules.
Workflow Rules allow us to update field values based on a trigger formula. First, we’ll set up a Workflow that populates our new End Date field based on the Start and the Duration. For this, we’ll set up our Workflow Rule Formula as follows :
ISCHANGED( GW_Volunteers__Duration__c ) || ( ISNEW() && ISNULL(DBk_EndDateTime__c))
Basically, if the Duration has changed or it’s a new record without a specified end time, then we’ll update the field using the Workflow Action. Working with Date Times in Workflow Rules is a little strange, as the unit of measure is a full day. In order to calculate in hours we need to work with fractions of that day unit, so our expression looks like this:
GW_Volunteers__Start_Date_Time__c + ( GW_Volunteers__Duration__c * 60 ) / 1440
A duration of 2 hours calculates as .0833 of a day, and that’s what we need to add to our Start Date Time for a correct result. A little odd, but it works.
We also need to do the reverse, so if someone edits the End Date Time in DayBack, then the Duration field is also updated accordingly. For this, our criteria is:
ISCHANGED( DBk_EndDateTime__c ) || ( ISNEW() && ISNULL( GW_Volunteers__Duration__c))
And then we update Duration via Workflow Action like this:
( DBk_EndDateTime__c - GW_Volunteers__Start_Date_Time__c ) * 24
That takes care of the End Date Time issue, but we also wanted to take advantage of DayBack’s ability to render multiple lines of information in DayBack’s Title field. This is a non-editable field that can be based on a formula field. Or multiple fields can be specified in DayBack’s field mapping, separated by commas, and each field will display as its own line. For this example we wanted some literal text in the display, so we created a new Formula field in Volunteer Shifts using the following expression:
GW_Volunteers__Volunteer_Job__r.Name & BR() & "Volunteers Desired: " & TEXT( GW_Volunteers__Desired_Number_of_Volunteers__c ) & BR() & "Volunteers Required: " & TEXT( GW_Volunteers__Number_of_Volunteers_Still_Needed__c )
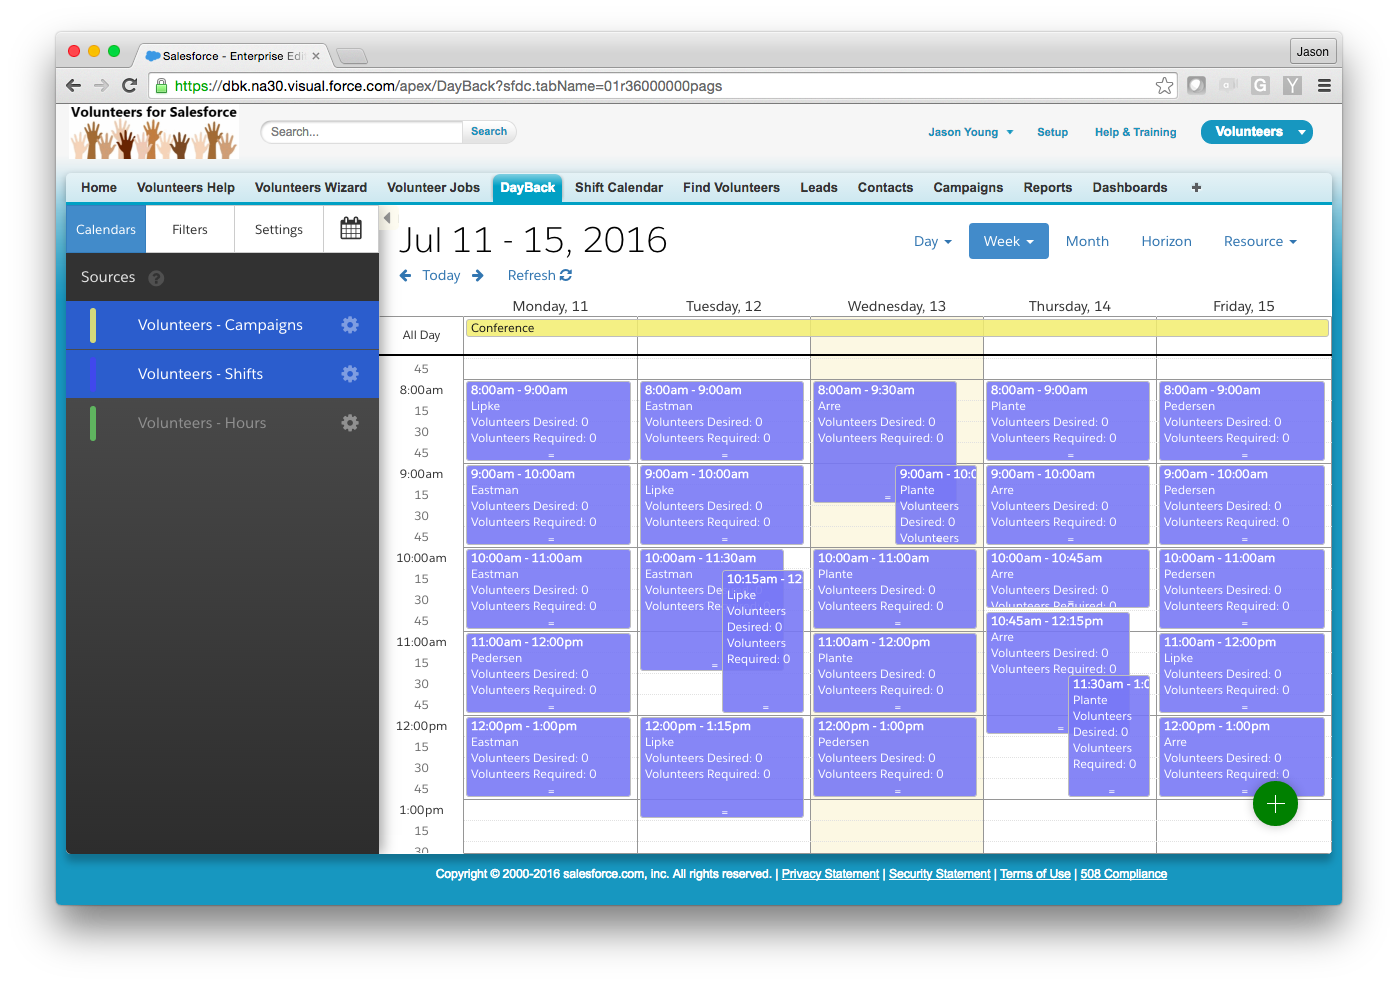
Now we can map this new field to DayBack’s Title field and voila! DayBack now gives a great view of the Shifts, with a nice indication of the total volunteers desired for the shift and the number still required:
Leveraging Custom Actions
Once the Shifts have been established, we now need to fill them with our Volunteers. This is handled by the Hours object, which joins the Volunteer/Contact with the shift. The Volunteers App provides a variety of ways for creating and updating the Hour objects, but we wanted to see if we could give users a quick way to create the Hours records right from DayBack Calendar. One of the great features of DayBack is the ability to create Custom Actions. Creating Custom Actions in DayBack is very similar to creating Custom Buttons and Links in Salesforce, in that we can open a URL or provide our own Javascript to carry out our action.
In this case, we want to navigate to the Edit Hours layout provided by the Volunteers App. We’ll start from a specific Shift in the calendar, so we’ll want to fill in as many of the default values from that Shift record to speed the process along. Our Custom Action can do this by using Javascript to navigate to the edit URL. We can then add additional parameters to the URL which will plug in the default shift values when we get there. When you create an Hours entry from a Shift object in Volunteers the URL looks something like this…
https://na30.salesforce.com/a02/e?CF00N3600000Nb2vO=Shift-00099 &CF00N3600000Nb2vO_lkid=a0536000006MDs9
…where the /a02/e represents the edit page itself and the parameters are the values we want filled in, but what’s going on here? The value half of theses pairings are clear enough, but where does that key come from? At first I thought it was some kind of field ID from the REST api, but after some Google searching I found the answer here on Saurabh’s Salesforce Blog. Basically the key value is the DOM element id of the input field (and can be determined using your browsers developer tools, if you ever have to figure out your own). Now we can determine the ids of our target fields and construct our URL accordingly so our Custom Action javascript looks like this:
var thisDate = moment('[[GW_Volunteers__Start_Date_Time__c]]');
var stringDateTime = thisDate.format('MM/DD/YY h:mm a');
var stringDate = thisDate.format('MM/DD/YY');
var url = '/a02/e' url += '?CF00N3600000Nb2uo=[[GW_Volunteers__Volunteer_Job__r.Name]]' url += '&CF00N3600000Nb2uo_lkid=[[GW_Volunteers__Volunteer_Job__c]]' url += '&CF00N3600000Nb2vO=[[Name]]' url += '&CF00N3600000Nb2vO_lkid=[[Id]]' url += '&00N3600000Nb2vF=' + stringDateTime url += '&00N3600000Nb2vH=' + stringDate; fbk.openURL(url);
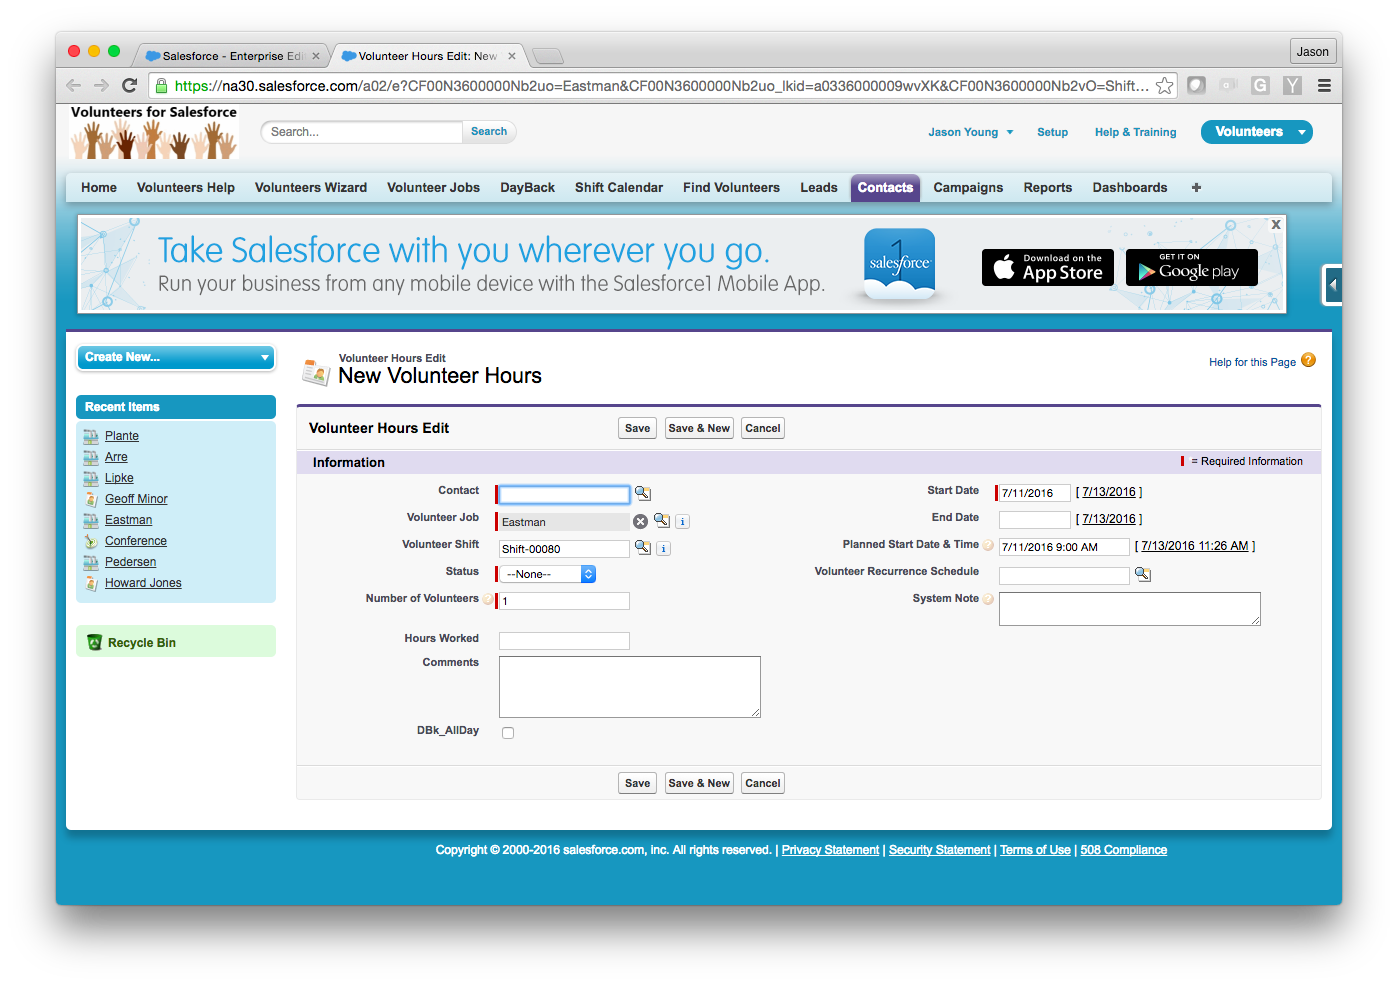
And when we use this action, we arrive at the edit layout with most of our required fields filled in. Our users just need to select a Status and the Contact:
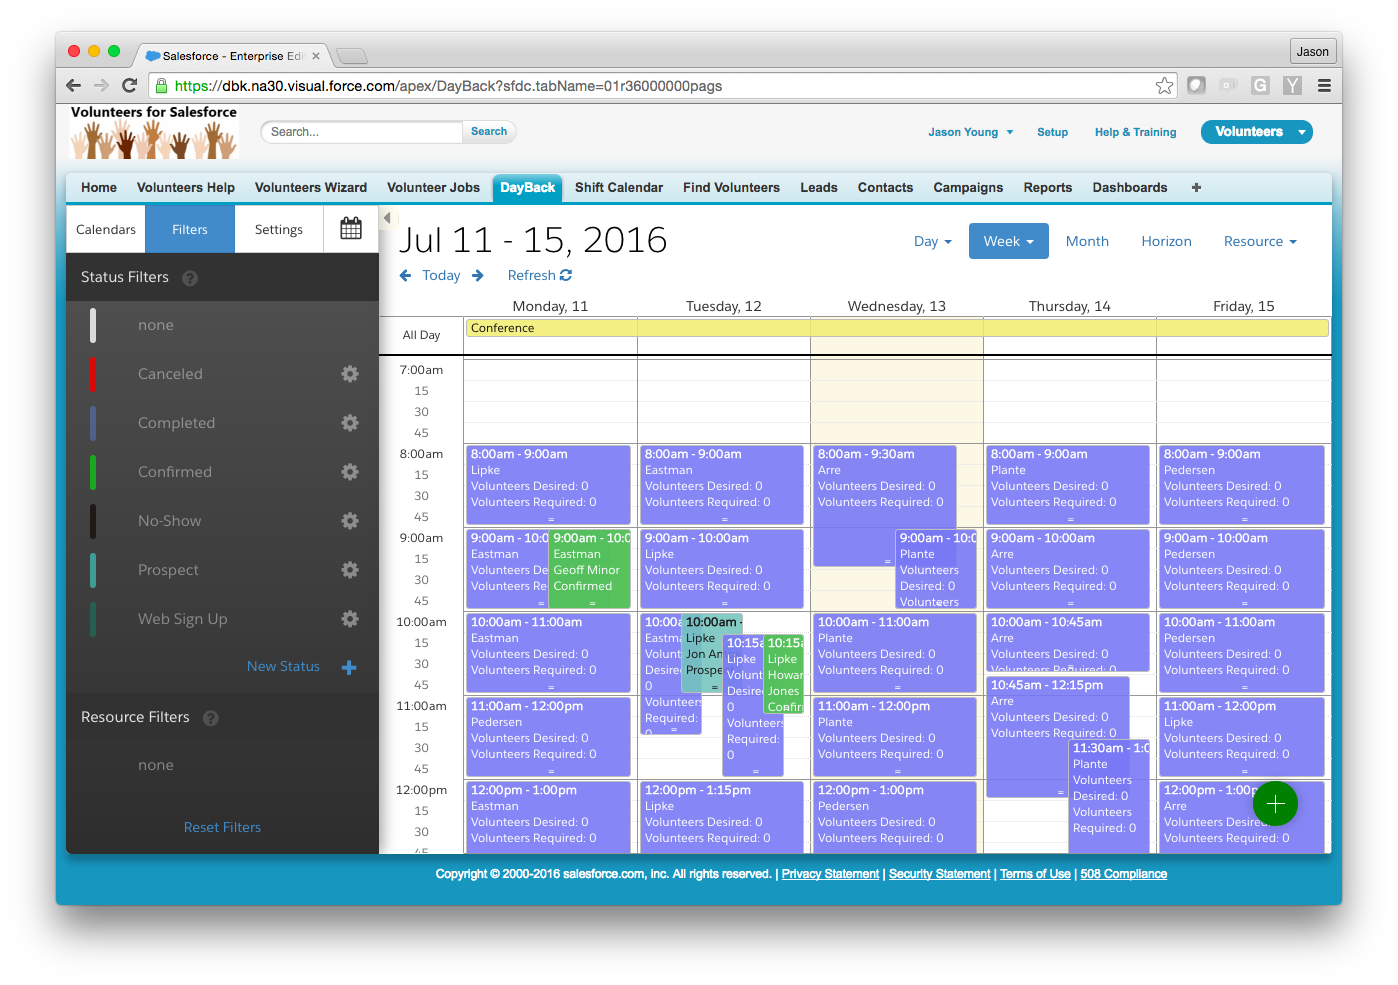
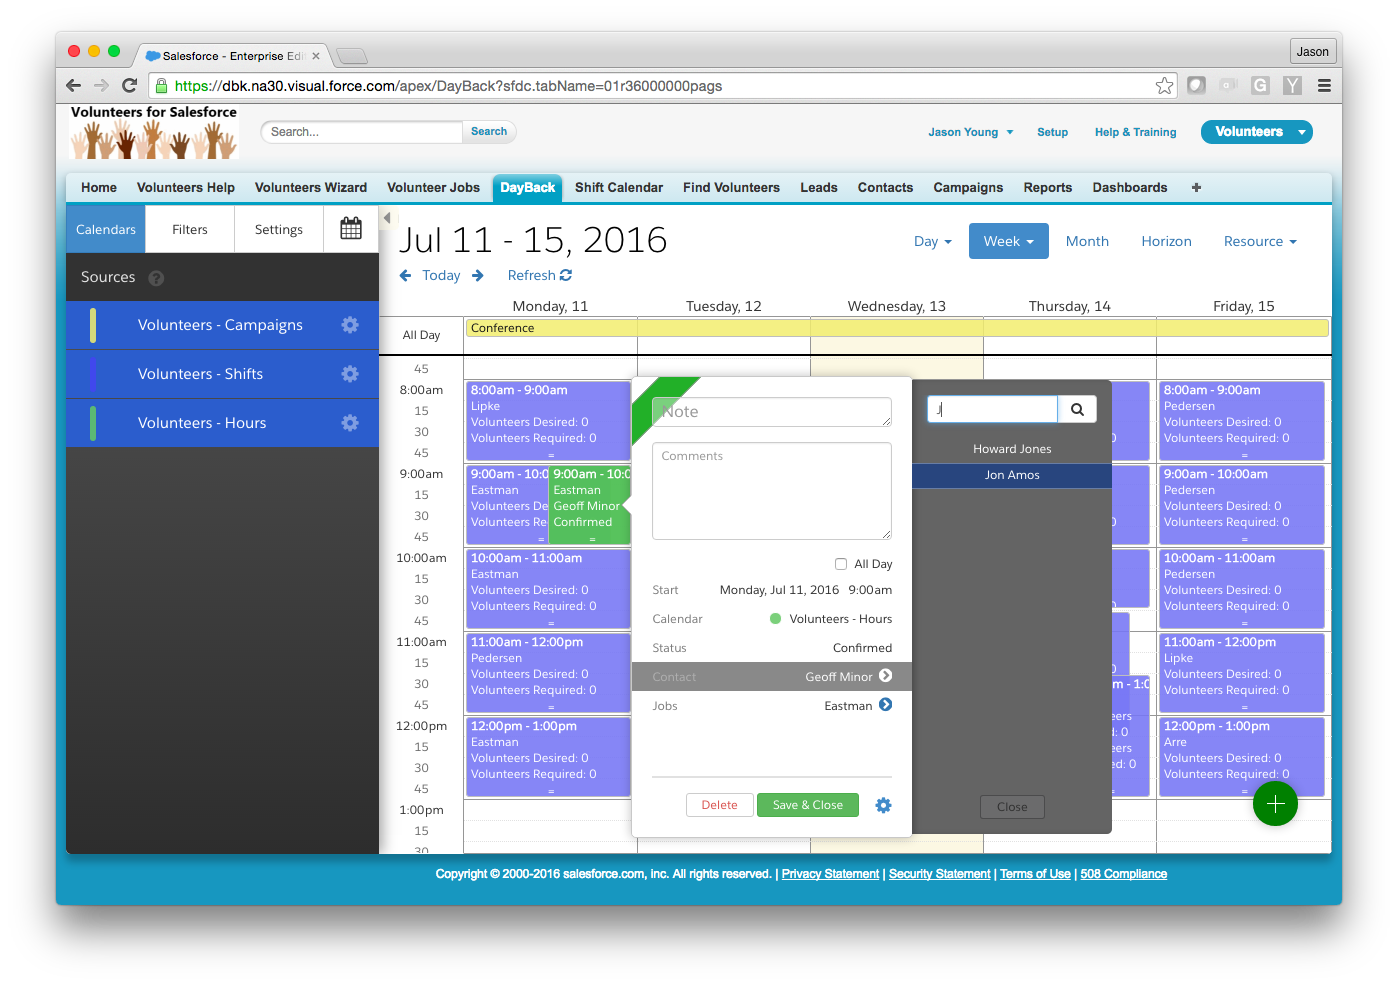
Once they do, we’ll have created our Hours entry and will see a very detailed view in DayBack of which Shifts have related Hours and the status of those Hours entries. (In green and teal below, color coded by status):
DayBack also allows us to reassign Volunteers (Contacts) to the Hours entries right from the calendar if things change:
Adding Buttons to the Volunteers’ Pages
Without DayBack, it can be difficult to know if a volunteer is already assigned to shifts before using the automatic recurrence schedule in the Volunteers app. Since the Volunteers app won’t prevent the creation of overlapping shifts, it would be nice to flag such conflicts visually. This is what DayBack is great at. And you can add a button to the volunteer’s page (their contact page) to show all their shifts and quickly see which ones are overlapping:
Instructions for making buttons like this can be found in DayBack’s docs here: Add DayBack Buttons to Your Salesforce Layouts. The specific button you’ll want to make for the example above is created in Setup under Build / Contacts / Buttons, Links, and Actions. The specific JavaScript you’ll want to use for the button follows:
{!REQUIRESCRIPT("/soap/ajax/36.0/connection.js")}
var result = sforce.connection.query("Select GW_Volunteers__Planned_Start_Date_Time__c from GW_Volunteers__Volunteer_Hours__c Where GW_Volunteers__Contact__c = '{!Contact.Id}' Order By GW_Volunteers__Planned_Start_Date_Time__c");
var record;
if(result.size==="1") {
record=result.records;
}
else if (result.size!=="0") {
record=result.records[0];
}
else if (result.size==="0") {
alert ( "No hours scheduled for this Contact" );
}
if(result.size!=="0"){
var startDate=record.GW_Volunteers__Planned_Start_Date_Time__c;
var url = 'https://dbk.na30.visual.force.com/apex/DayBack?sfdc.tabName=01r36000000pags';
url+='&date='+startDate;
url+='&filterContacts={!Contact.Name}'
url+='&view=basicHorizon';
url+='&source=Tasks';
window.location=url;
}
The Result: a Custom Fit
We were very pleased with the result, as right away it felt like DayBack was very much a part of the Volunteers App. I think much of this comes from DayBack’s ability to work with any Custom Object that has a Date or DateTime field as well as the ease with which you can make changes to Salesforce objects, even Custom Objects in Managed Packages. It’s also the general “component feel” of Salesforce: for example, we can easily add buttons to the Volunteer tab set and use simple URLs to communicate between Volunteers and DayBack so everything feels like it was made together as a single app. It’s a powerful environment, and with the new Lightning Experience is clearly drawing on these strengths, the future looks bright!

Leave a Reply