By default, DayBack color-codes your events by their status: more precisely, by whatever you’ve mapped to the status field. Coloring by status makes sense since many of DayBack’s scheduling views already put events into their own columns or rows by resources.
But if you’d like to add a second color for the event’s resource, you can do that by changing the event styling in DayBack to add a second color.
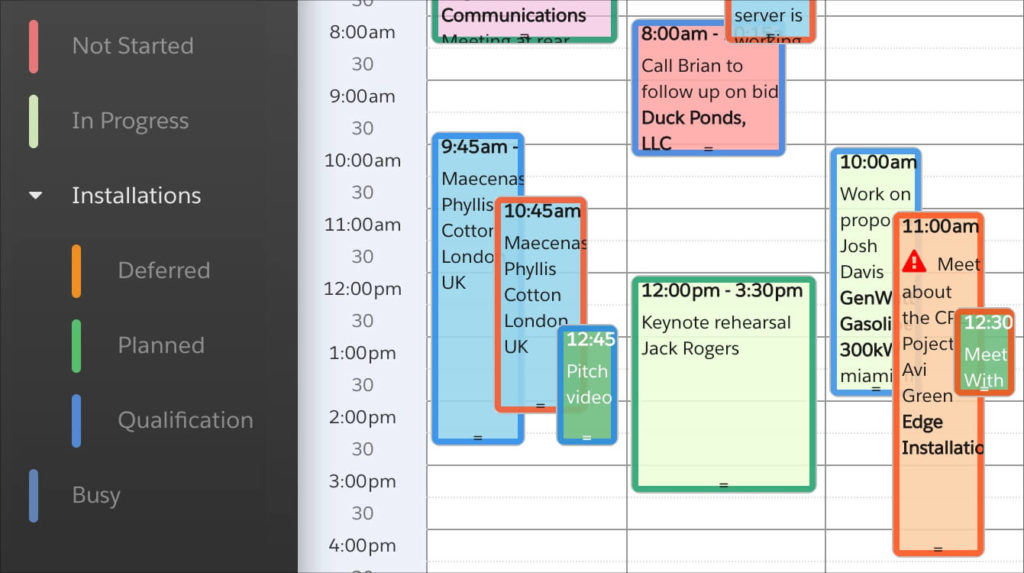
In this example, we’ll add a frame around each event where the frame’s color corresponds to the event’s resource. (Note that the technique used here will let you base the frame on the contents of any field, not just resource.)

If you don’t like the frames’ width or colors, you can change that in the CSS the follows below. And if you’d like to see a completely different way to display a second color, check out this post where you’ll learn how to add a header-color to each event.
Add A Second Color to Your Calendar
Begin by changing the way your event title is mapped in DayBack. Click the gear next to the calendar you’re interested in and find the event display field. Then add this string at the beginning of the display section. Note that where it says “Owner.Name” you can replace that with any other field you’ve mapped elsewhere on the page.
Here’s the text we pasted into the front of the display field…
<dbk-css class="Owner.Name"></dbk-css>
That dbk-css string creates a class using the resource name of your event. Once you have a class with the resource name, add the following CSS to DayBack and you’ll see a colored frame for each resource. A few things to keep in mind:
- You’ll want to create specific CSS for each resource: you’ll see three resources in the CSS below, following /* Resource Name 1 */ and then /* Resource Name 2 */, etc.
- If your resource name has more than one word, like “Beth Reynolds”, you’ll replace that space with a period in the CSS, so Beth Reynolds becomes Beth.Reynolds
Here’s some example CSS with styles for three resources: Beth Reynolds, James Woolsey, and Peter Samuels…
/* Resource Color Frame Customizations */

.fc-event-inner {
  margin-top: 2px;
  margin-right: 2px;
  margin-left: 2px;
}
.fc-event-draggable {
    padding-left: 0;
}
.fc-event-draggable .fc-event-time, .fc-event-draggable .fc-event-title {
    padding-left: 3px;
}
.fc-view-agendaDay .fc-event-time, .fc-view-agendaDay .fc-event-title, .fc-view-agendaWeek .fc-event-time, .fc-view-agendaWeek .fc-event-title, .fc-view-agendaResourceVert .fc-event-time, .fc-view-agendaResourceVert .fc-event-title, .fc-view-agendaResourceHor .fc-event-time, .fc-view-agendaResourceHor .fc-event-title {
    width: 96%;
    overflow: hidden;
}
.fc-event-vert.fc-event-end {
    border-bottom-left-radius: 6px;
    border-bottom-right-radius: 6px;
}
.fc-event-vert.fc-event-start {
    border-top-left-radius: 6px;
    border-top-right-radius: 6px;
}

/* Resource Name 1 */
.Beth.Reynolds::before {
    position: absolute;
    left: 0;
    top: 0;
    content: ' ';
    width: 100%;
    height: 100%;
    z-index: -1;
    background-color: transparent;

/* Modify Border Color and Size here */
    border: 4px solid rgba(255, 70, 10, 1);

    /*border-radius: 4px;*/
    box-sizing: border-box;
    -moz-box-sizing: border-box;
    -webkit-box-sizing: border-box;
}


/* Resource Name 2 */
.James.Woolsey::before {
    position: absolute;
    left: 0;
    top: 0;
    content: ' ';
    width: 100%;
    height: 100%;
    z-index: -1;
    background-color: transparent;

/* Modify Border Color and Size here */
    border: 4px solid rgba(33, 132, 234, 1);

    /*border-radius: 4px;*/
    box-sizing: border-box;
    -moz-box-sizing: border-box;
    -webkit-box-sizing: border-box;
}

/* Resource Name 2 */
.Peter.Samuels::before {
    position: absolute;
    left: 0;
    top: 0;
    content: ' ';
    width: 100%;
    height: 100%;
    z-index: -1;
    background-color: transparent;

/* Modify Border Color and Size here */
    border: 4px solid rgba(0, 150, 100, 1);

    /*border-radius: 4px;*/
    box-sizing: border-box;
    -moz-box-sizing: border-box;
    -webkit-box-sizing: border-box;
}

/* End Resource Color Frame Customizations */
That’s it! Please get in touch if y have questions about adding colors or styling your calendar. You should be able to understand your calendar at a glance, and we’re here to help.
Leave a Reply