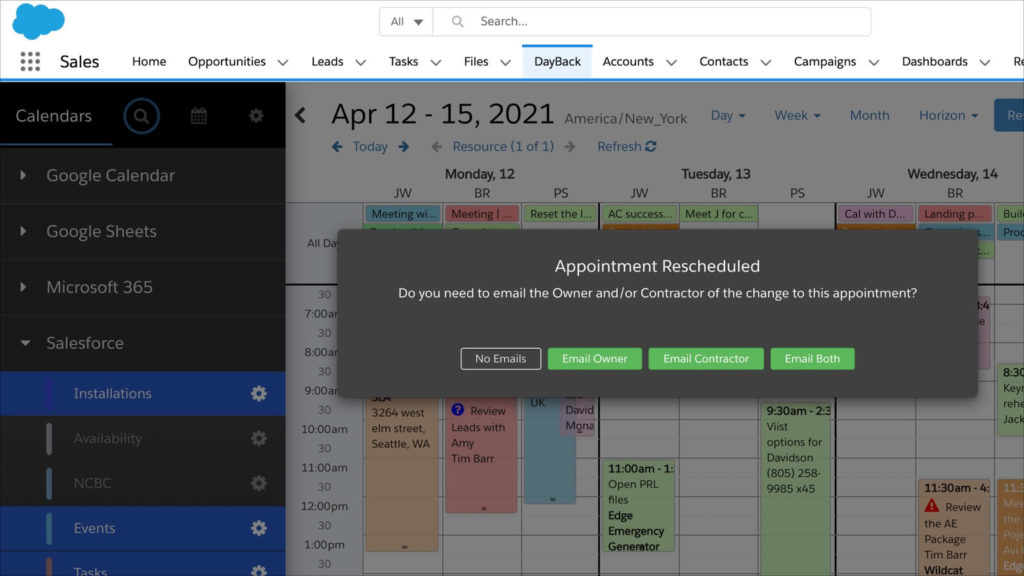
Your workflows may need to present users with choices in the form of custom dialogs. DayBack provides a straightforward function to include dialogs like this in your custom actions and show dialogs when users edit events. This function offers a way to specify the dialog title, message, and one or two button options. However, needing more than two buttons is not an uncommon requirement. How can developers set up more complex dialogs within their Custom Actions?
This post will review the pattern for using the standard two-button dialog and then look at setting up a similar one that provides four buttons. Our next post will expand on this theme to examine adding input fields to these dialogs.
(For a great example of how far you can take these dialogs, check out how we’re automating reminders from our help desk system.)
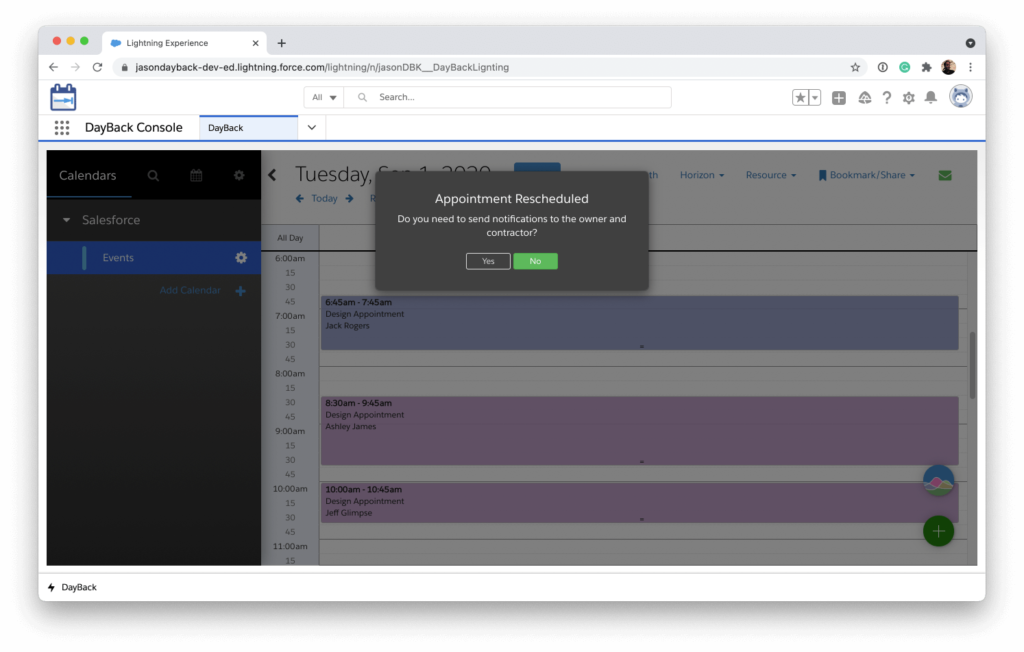
Simple Two-Button Modal Dialog
Several examples in our documentation include the function and pattern for adding the standard two-button modal dialog using the utilities.showModal function.
utilities.showModal( title, message, cancelButtonText, cancelFunction [, confirmButtonText, confirmFunction] )
The arguments in this function are straightforward, consisting of strings for defining the various texts and two callback functions depending on which button the user clicks.
Below is an example where DayBack will present the user with a modal dialog if either the start time or end time has been modified for an existing event. DayBack will then set a custom field with the user’s button selection to be saved along with their other edits. You could then set up a server-side process to look for the value in this field and take the appropriate action. In FileMaker, for example, a scheduled script on the server can look for changes to this field and then email the notifications. In Salesforce, a process, flow, or trigger could do the same.
When modifying these examples be sure to specify the id of your custom field as it will be different from the one referenced below on line 18.

Here’s the example On Event Save action for that two-button dialog:
//Set Notification Field v1.0

//Purpose:
//This action will present a modal dialog when an existing Event has its start or end modified
//Dialog will have 2 buttons for the dialog options
//Send Notifications, Don't Send Notifications
//Custom Field will be set based on user selection

//Action Type: On Event Save
//Prevent Default Action: Yes

//More info on custom actions here:
//https://docs.dayback.com/article/20-event-actions

//config variable
// !!UPDATE THIS VALUE TO THE ID OF YOUR CUSTOM FIELD!!
//https://docs.dayback.com/article/109-additional-fields
var messagingFieldId = '1616709853427-0911136518';


//----------- You shouldn't need to edit below this line -------------------

//trigger action function?
if( event.eventID && ( changesObject.start || changesObject.end )){
    //existing appointment (has an Id) has had its start or end changed
    appointmentMoved();
  }
  else{
    //new appointment or no change to start or end
    action.callbacks.confirm();
  }

  function appointmentMoved() {
    //config variables
    var title = 'Appointment Rescheduled';
    var message = 'Do you need to send notifications to the owner and contractor?';

    //call standard modal function
    utilities.showModal(title, message, 'Yes', dontSendFunction, 'No', sendFunction);

    //callback functions
    function dontSendFunction(){
        //user pressed no just allow Event Action to continue
        action.callbacks.confirm();
    }

    function sendFunction(){
        changesObject[messagingFieldId] = 'Yes';
    }

  }
Adding a Four-Button Dialog
Under the hood, the utilities.showModal function used above is essentially a wrapper for another utility function that builds and defines the dialog’s behavior. This is the utilities.popover() function, which is also available in the custom action scope. This function has two arguments, but they’re a little more complex than the showModal function as the HTML itself needs to be defined as well as the configuration object that defines the dialog’s properties.
utilities.popover( template, config )
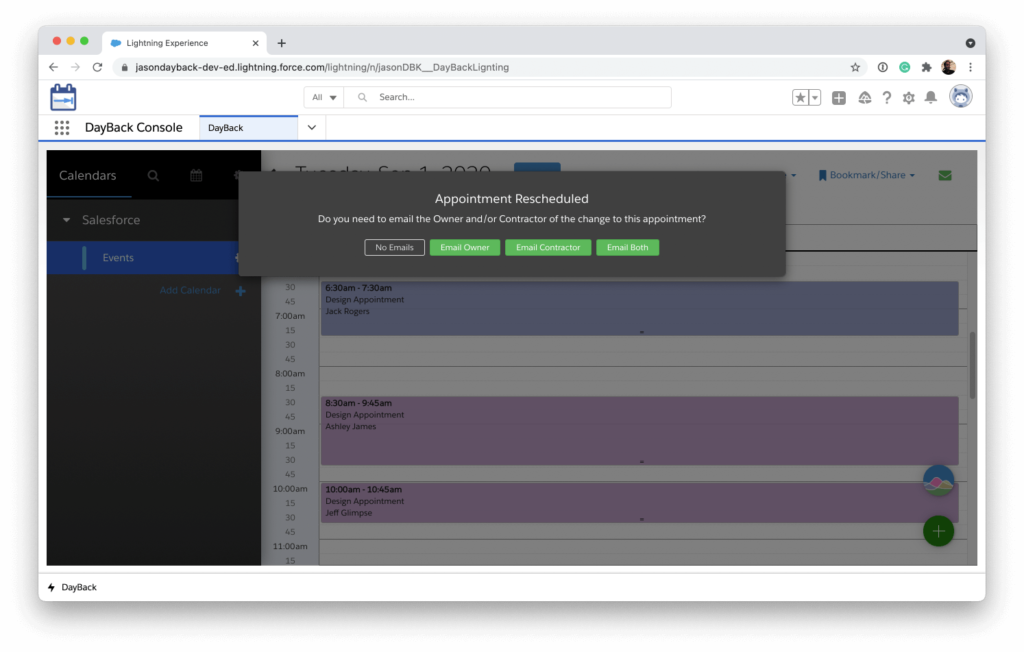
In this example, the user will have four button options so they can target the correct parties rather than always sending the notifications to everyone.

Building the Dialog’s HTML with ng-click
When the HTML string is built it’s going to use the simple Angular directive ng-click to bind the callback function to the different buttons as well as the argument specifying which option/button was selected. The function itself will be passed in via the config argument object and will look something like this:
ng-click="popover.config.buttonCallbackFunction('Owner')"Defining the Configuration Object
The configuration object has a fair number of properties, but in most cases, the only ones you’ll need to modify are the ones to define your callback functions and the width property. The rest can follow the values you see in the example below. I’ve included all the properties in this example, even if they’re empty, so you can experiment with the others and see what they do. In this case, the callback function is defined with the property buttonCallbackFunction. Be sure this property name matches the name of the function assigned to the ng-click function (above) when building your HTML.
Here’s the example On Event Save action for the four-button dialog using the configuration object:
//Set Notification Field v1.1
//Purpose:
//This action will present a modal dialog when an existing Event has its start or end modified
//Dialog will have 4 buttons for the dialog options
//No Emails, Email Owner, Email Contractor, Email Both
//Custom Field will be set based on user selection
//Action Type: On Event Save
//Prevent Default Action: Yes
//More info on custom actions here:
//https://docs.dayback.com/article/20-event-actions
//config variable
// !!UPDATE THIS VALUE TO THE ID OF YOUR CUSTOM FIELD!!
//https://docs.dayback.com/article/109-additional-fields
var messagingFieldId = '1616709853427-0911136518';
//----------- You shouldn't need to edit below this line -------------------
//trigger action function?
if( event.eventID && ( changesObject.start || changesObject.end )){
//existing appointment (has an Id) has had its start or end changed
appointmentMoved();
}
else{
//new appointment or no change to start or end
action.callbacks.confirm();
}
function appointmentMoved() {
//config variables
var title = 'Appointment Rescheduled';
var message = 'Do you need to email the Owner and/or Contractor of the change to this appointment?';
//define the buttons' html
//use angular ng-click to bind functions passed in config below
//set function argument in ng-click argument
//no Emails, class as cancel style
var noEmailsButton = '<button translate ng-click="popover.config.buttonCallbackFunction();" class="btn btn-xs btn-secondary">No Emails</button>';
//Send buttons, class as success buttons
var emailOwnerButton = '<button translate ng-click="popover.config.buttonCallbackFunction(\'Owner\');" class="btn btn-xs btn-success dbk_button_success">Email Owner</button>';
var emailContractorButton = '<button translate ng-click="popover.config.buttonCallbackFunction(\'Contractor\');" class="btn btn-xs btn-success dbk_button_success">Email Contractor</button>';
var emailBothButton = '<button translate ng-click="popover.config.buttonCallbackFunction(\'Owner;Contractor\');" class="btn btn-xs btn-success dbk_button_success">Email Both</button>';
//define popver html as string, inserting title, message and buttons
var template =
'<div style="background: rgba(0,0,0,0.75); color: white;">' +
'<div class="pad-large text-center">' +
'<h4 translate>' + title + '</h4>' +
'<p>' + message + '</p>' +
'<div class="pad">' + noEmailsButton + ' ' + emailOwnerButton + ' ' + emailContractorButton + ' ' + emailBothButton +
'</div>' +
'</div>' +
'</div>';
//define popover config
//define button functions and width, the rest can stay unchanged
var config = {
container: document.querySelector('#calendar-container') ? '#calendar-container' : '#app-container',
type: 'modal', // modal or popover
destroy: true,
buttonCallbackFunction: buttonCallback,
width: 800,
onShow: '',
onShown: '',
onHide: '',
onHidden: '',
show: true
};
//call utility function to evoke modal
utilities.popover(config, template);
//button callback functions
function buttonCallback(data) {
//close popover
config.show = false;
//set custom field from argument
if (data) {
changesObject[messagingFieldId] = data;
}
//continue On Save Event
action.callbacks.confirm();
}
}Conclusions
Building out the full HTML for your dialog using the utilities.showPopover function is more involved than the simple arguments of the utilities.showModal function. However, this approach allows developers to customize every aspect of the dialog to create something particular to their workflow.
Enjoy!
Part 2: Adding input fields to your dialog to make simple forms.
Leave a Reply