When we make promises to our customers, we often create reminder events in DayBack to follow up on the commitments we’ve made. In today’s post, we’ll show you a customization we built to automate reminders by integrating DayBack with our help desk platform.
We use Help Scout to manage our customer service workflow, but we have always created follow-up reminders by hand until now. We’ve designed a Follow-up Reminder tool using Help Scout’s 3rd Party APIs, DayBack URLs, and DayBack’s Custom Actions to make our work easier. We hope this gives you some ideas of the types of things you can achieve using DayBack’s Custom App Actions. Here’s what it looks like in action:
Creating Reminder Events in DayBack
Step 1: Custom Help Scout Browser Extension
We need some way to start the reminder process. In other apps, this might get started from a custom button or a flow, but HelpScout doesn’t let us add custom JS inside their interface. So we opted to build a browser extension that injects our reminder button inside Help Scout.
The extension inserts a blue “Create Reminder” bell icon when the extension detects that we are working on a Case. The button appears right in the Help Scout menu bar. Clicking the button or pressing the Shift+R keyboard shortcut triggers the Create Reminder workflow and sends the information over to DayBack Calendar.
If one of us has made a promise to a customer, we can use either the reminder button or the keyboard shortcut to open a new web browser window, which sends the Help Scout Case Number and Case Id over to DayBack in a DayBack URLs string like this:
https://app.dayback.com/#/?source=SeedCode%20Shared&view=agendaWeek&hsaction=createReminderEvent&hscase=19134&hsid=3698732343
Step 2: Using DayBack URLs
Inside the URL, we pass in source and view parameters. These parameters ensure that we switch to the SeedCode Shared calendar in a Weekly Agenda view, the optimal view for reminder scheduling. Check out the documentation for a complete list of DayBack URL parameters built into the calendar, which you can use to create custom links.
We also pass in a new set of parameters to trigger the new workflow: hsaction, hscase, and hsid. A Custom App Action scans for these new URL parameters in a new Before Calendar Rendered action when DayBack loads and launches the reminder creation wizard.
Step 3: New Custom App Action
Once the URL has been read, we’ll use the information to query Help Scout and get some more information about the case. We retrieve the case information from Help Scout using their JSON API. This allows us to pull in all of the information we need to schedule a follow-up. We haven’t included this code here since it’s pretty specific to Help Scout, but let us know if you’re working in Help Scout. We’d be happy to send you the details.
Step 4: Custom Popovers in DayBack
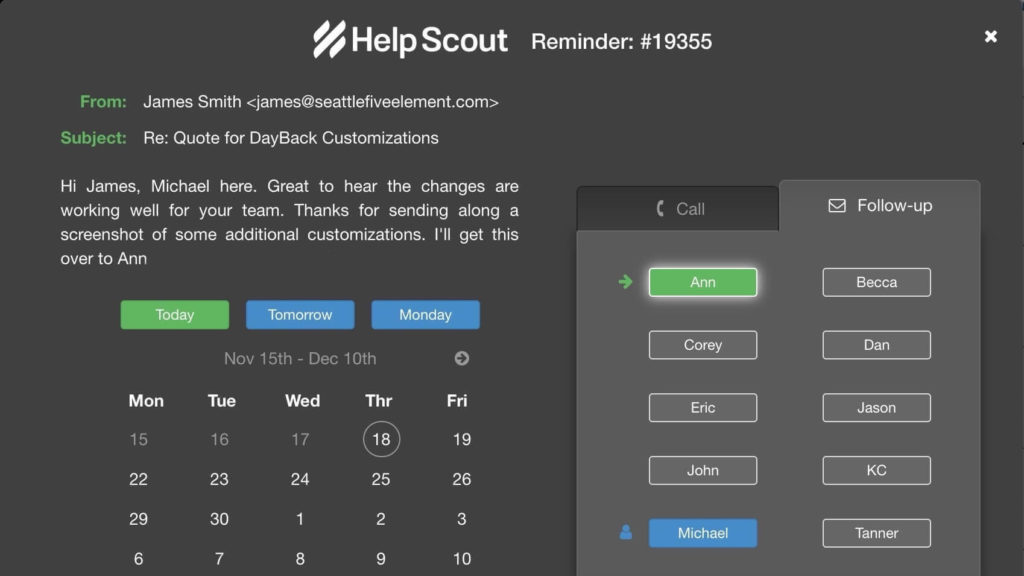
To allow us to quickly select who should follow up on the case, we created a custom resource selector and a date picker inside a modal window that comes up to help you assign and schedule the reminder:

The modal displays a summary of the Help Scout case along with a list of tabs for different reminder types, a list of buttons for each person we can schedule, and a date picker showing the next four weeks. The date picker also allows us to quickly toggle forward if we need to create a follow-up further into the future.
This helper window was built in native JavaScript and CSS, with no changes to our core code. DayBack includes some methods to make creating helpers like this easier. If you’re curious how to script a powerful custom popover such as this from start to finish, check out this blog post Add Custom Dialogs to Your Calendar – Including Buttons for a comprehensive walkthrough of how this type of popover can be written.
Follow-ups:
To quickly decide who should follow up on the case, we pre-select the currently-assigned team member in green by pulling this information from Help Scout. We also highlight ourselves in blue, so we can easily find ourselves in the list if we want to remind ourselves instead.
Calls:
When scheduling a call, we may want to include multiple team members. The popover allows us to select multiple individuals before we pick the date on which the call should take place:

Adding a New Calendar Event on the Specified Date:
Once the correct person is selected, all we need to do is click on the date of the follow-up, and our custom action will add the reminder to our calendar
Step 4: Creating a new Reminder Event
Once a user clicks on the appropriate date, we trigger an After Events Rendered app action, which creates the new event. The event is set up differently depending on how we want it configured:
- The Title contains the initials of the person, or people who will be following up on the case, followed by the case number. This allows our whole team to tell at a glance who is working on follows ups throughout the day
- The Description contains the customer information and a link to open up HelpScout case in a new window
- The Status is set to “Pending” for email follow-ups, and a “Call” status for phone calls. This allows us to visually tell what type of event is scheduled at a particular time
- The Resources are pre-selected based on who was chosen in the popover
- The Start Time and Duration of the event is determined based on company-wide defaults, but some members of our team like to do follow-ups in the morning, others prefer to do them in the afternoon after they’ve taken care of their coding projects for day. This configuraiton can be quickly changed by each team member in App Action configuration section, and folks have already branched this to create different defaults for specific users:
// Set default reminder duration and start time
inputs.defaultPreferences = {
    durationMin: 30,
      startTime: '8:00am'
};

// Set user-specific defaults
inputs.userPreferences = {
    'Ann':     { startTime:  '4:30pm' }
    'KC':      { startTime: '10:00am' }
    'Michael': { startTime:  '1:00pm' }
};
Putting it All Together
As you can see, DayBack is a fully scriptable calendar with built-in components that can be combined in powerful ways. By taking the time to optimize our internal workflows, we can be sure never to miss an important follow-up for our customers.
We hope this post gives you some ideas of how you can extend DayBack using our scriptable tools. If you’d like help with creating your own custom actions, we’d be happy to help point you to code samples, or we can create custom actions that streamline your workflow. Please get in touch.
Leave a Reply