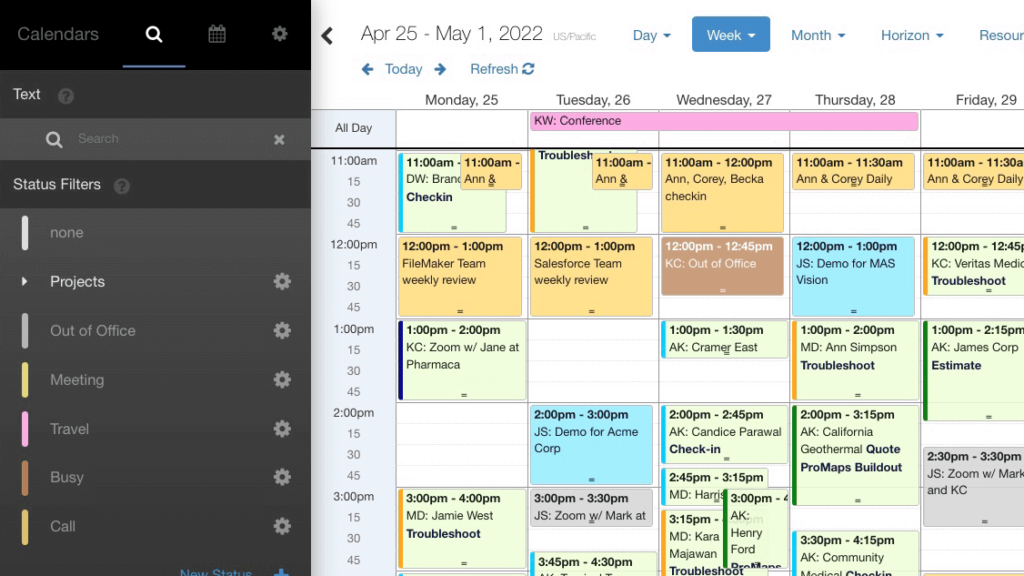
It’s really helpful to glace at your calendar and know exactly what your team has on the schedule. We’d love to share the latest eye candy we added to make events stand out in DayBack.
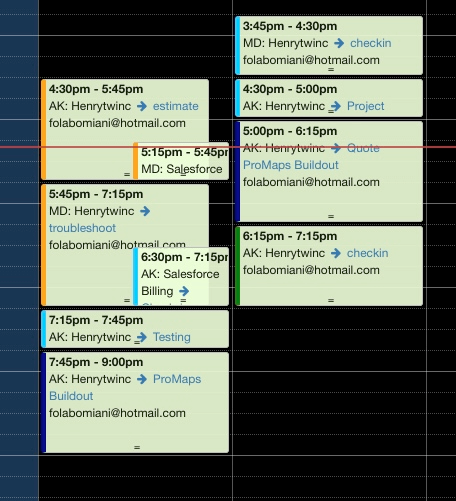
By using a Custom Field and a Custom App Action, you can dynamically paint an event’s border color so that it shows a stripe based on the value of your custom field. This allows you to continue to color the event by status while adding conditional coloring that tells you more information about the event. This example can be easily modified to change the whole border, inject icons, or perform other stylistic changes based on a calculation that you define.
When we schedule reminders for our team, we want to see which events involve trouble-shooting, quoting an estimate, or a general follow-up. We modified our in-house Helpscout Reminder system to allow our customer support team to specify a reminder type when creating reminders for their teammates.
In this example, we’ve set up 4 reminder types, each with its own border color. This involved a 3-part process:
- We set up a Custom Field that will store the Reminder Type for each event
- We defined CSS style for each of the 4 reminders types with a border width and border-color
- We created a Custom App Action that scans all on-screen events and applies the CSS border style to the Event if the event matches one of the 4 reminder types
Add this to Your DayBack
Step 1: Create a Custom Field
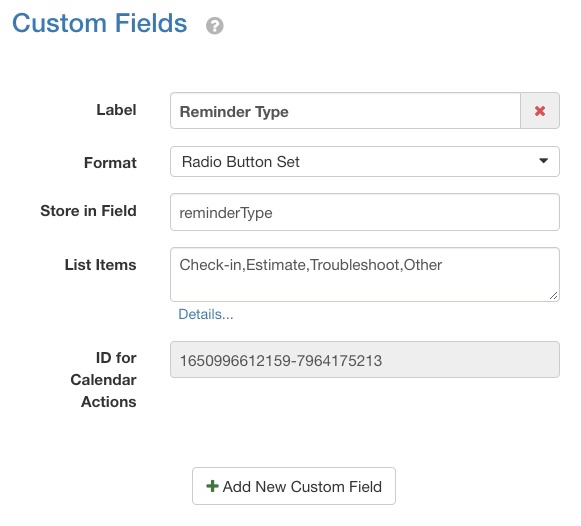
We called our custom field “Reminder Type” and defined it as a Radio Button Set, with four reminder types: Check-in, Estimate, Troubleshoot, and Other. (A picklist field would also have worked well for this example.)
While we chose to color the event based on a predefined list of values, you could make this app action much more sophisticated if you needed to. You could, for example, define a currency field that captures the value of a contract associated with an event. You could optionally assign a border color based on an appointment’s value, customer account tier, or some other metric. Here are a few other ways you could modify this action to apply custom styles:
- Using a different color scheme by Calendar, Status, or Resource
- Applying a different color by Resource Attributes, Skills, or Tags
Step 2: Define your Border Styles
We added the following four CSS classes to our custom CSS. Each class overrides the default border width and border color when applied to an event:
/* Light blue for Check-ins */
.reminderType_checkin_class {
    border-left: 5px solid rgb(0, 204, 255) !important;
}

/* Green for Estimates */
.reminderType_estimate_class {
    border-left: 5px solid green !important;
}

/* Orange for Troubleshooting */
.reminderType_troubleshoot_class {
    border-left: 5px solid orange !important;
}

/* Dark Blue for other Reminder Types */
.reminderType_other_class {
    border-left: 5px solid darkblue !important;
}
Step 3: Configure the Custom App Action
Here’s how we configured our app action to apply each style based on the individual reminder type:
// Define the Calendar Sources that should be
// scanned for specific Custom Field values

inputs.reminderCalendar = [ 'SeedCode Shared' ];

// Define the Custom Field name that contains information
// that can be used to style an Event

inputs.customFieldName = 'reminderType';

// If we find events where this Custom Field is defined,
// apply a CSS class to the Event based on the value
// stored in the Custom Field. If a field is empty, or
// does not contain a value defined in this list, the
// event will simply assume DayBack's default Event style

inputs.eventStyleByFieldValue = {

    // Field Value:   // CSS Class Name:

    'Check-in':       'reminderType_checkin_class',
    'Estimate':       'reminderType_estimate_class',
    'Troubleshoot':   'reminderType_troubleshoot_class',
    'Other':          'reminderType_other_class'
};
The full code of this custom app action can be downloaded from our extensions library:
Things to Learn from this Example
Are you a New DayBack Developer? If you’re new to DayBack and are thinking of writing your own JavaScript app actions, keep reading to learn how we wrote this action. The key feature of this action is the ability to scan all of the events on the page after they’ve already been loaded. Once we have all events in an array, we must filter for just the events that need to be modified, and then apply a CSS style to the event based on the list of CSS classes defined in our eventStyleByFieldValue object.
Here’s a breakdown of the main section of code that we use to scan all of the events, and apply the appropriate CSS class:
// Get a list of calendars, and all calendar events
var schedules = seedcodeCalendar.get('schedules');
var events    = seedcodeCalendar.get('element').fullCalendar('clientEvents');

// Loop through all schedules
schedules.forEach(schedule => {

    // Check if the schedule is included in our configured list of schedules
    if (inputs.reminderCalendar.includes(schedule.name)) {

        // Get the numerical Custom Field ID for our Custom Field
        var customFieldId = dbk.getCustomFieldIdByName(inputs.customFieldName, schedule);

        // Find all events that contain a filled-in Custom Field value
        var reminders = events.filter(event => {
            return event.hasOwnProperty(customFieldId) &&
                    event[customFieldId] !== undefined &&
                    event[customFieldId] !== "";
        });

        // Loop through all matching reminder events and apply a custom CSS
        // class based on the value of the Custom Field
        reminders.forEach(event => {
            // Get the on-screen element of the event
            let cell = document.querySelector('[data-id="' + event['_id'] + '"]');

            // Get the class we should apply and add it to the event's CSS class list
            let cssClassName = inputs.eventStyleByFieldValue[event[customFieldId]];
            if (cell && cssClassName && !cell.classList.contains(cssClassName)) {
                cell.classList.add(cssClassName);
            }
        });
    }
});
If you’d like to modify this action to use a different set of criteria, check out our Actions, Objects and Methods page, which shows you a list of functions you can call in your app actions. If you want to use a different set of criteria in your filter, and want to know what event-specific fields you can use in your coloring criteria, check out the list of available fields you can access.
Feel free to reach out if you have any questions about developing your own app actions. We’d be happy to point you to code samples and ideas that can help.


Leave a Reply