Action Plans is a free app by Salesforce Labs that lets you create task templates and apply them to new Leads and Opportunities (really any native object). This means you can embed your procedures in templates and then cascade these tasks onto your teams calendar each time they’re needed. In this article we’ll to take a look at integrating the Salesforce Action Plans app with DayBack Calendar so you can manage these tasks on a shared calendar.
 This is our third post in a series on integrating DayBack with other scheduling apps available on the App Exchange, previously examining Volunteers for Salesforce and Taskfeed.
Action Plans is a different kind of app than Volunteers and Taskfeed as it really doesn’t provide the general users in an org with a new set of tabs and features. Instead it’s more of a utility for an admin (or scheduler) to automatically creates Tasks based on templates. It only creates Tasks (not Events, or other records), and these Tasks must be related to a standard parent object: Accounts, Contacts, Leads, Opportunities, Campaigns Contracts and Cases. However, since it’s an unmanaged package it can be modified and there is some documentation for adding Custom Objects as parents in the App Exchange listing.
Setting Up the Salesforce Action Plans app
Setup: Templates
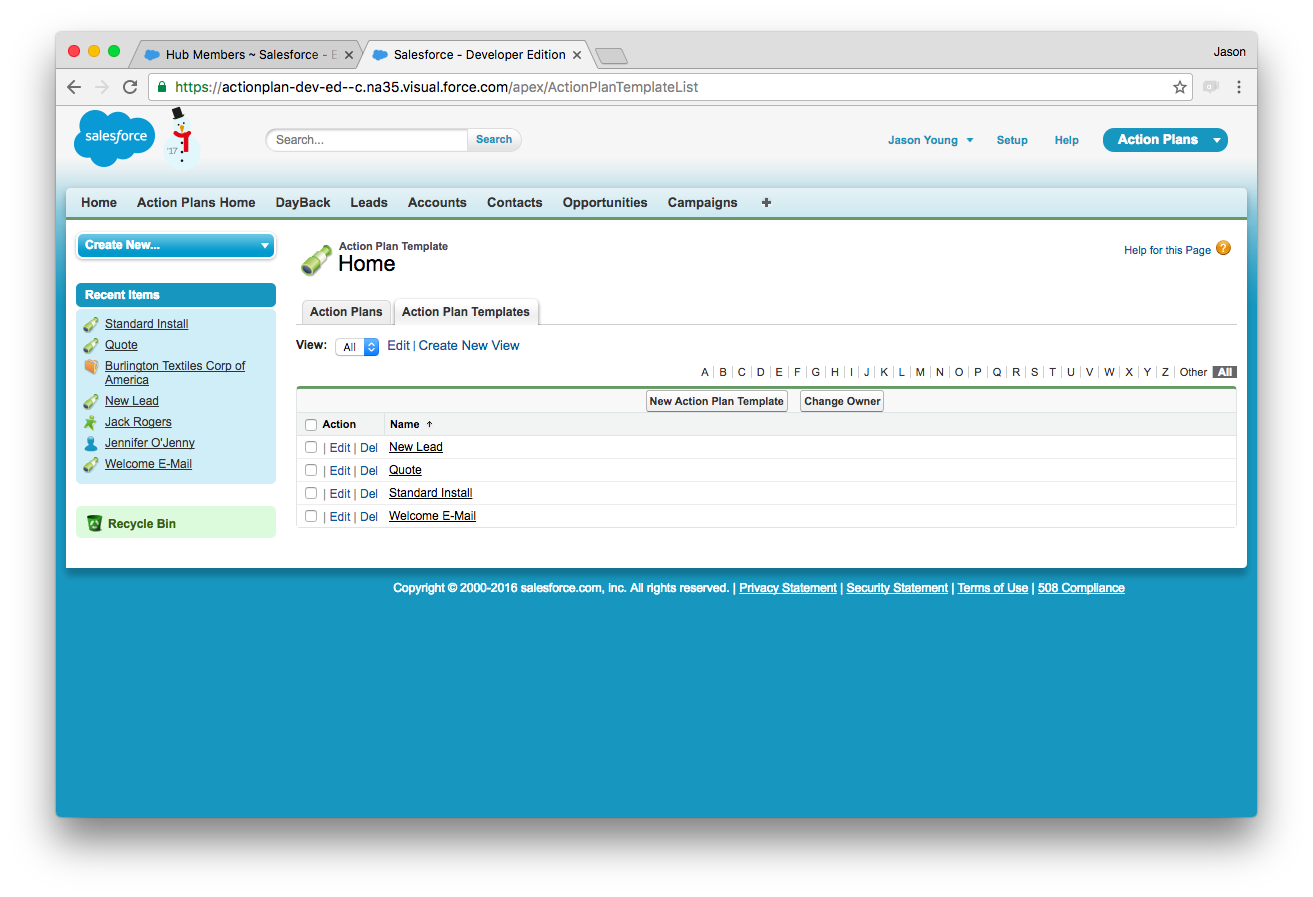
The first step in setting up Action Plans is setting up your Action Plan Templates. This can be done on the Action Plans Home tab or the Action Plan Templates tab. The Action Plans Home tab just has two subtabs on it for Action Plans and Action Plan Templates, so it’s really the only tab you need for set-up.
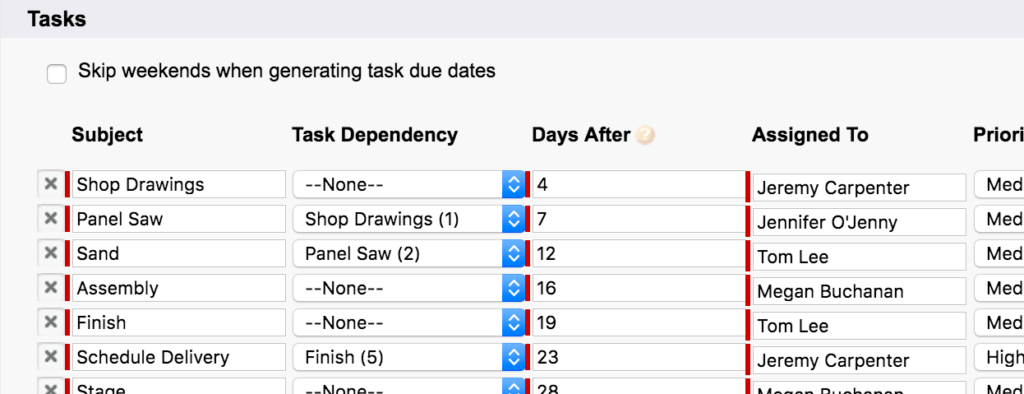
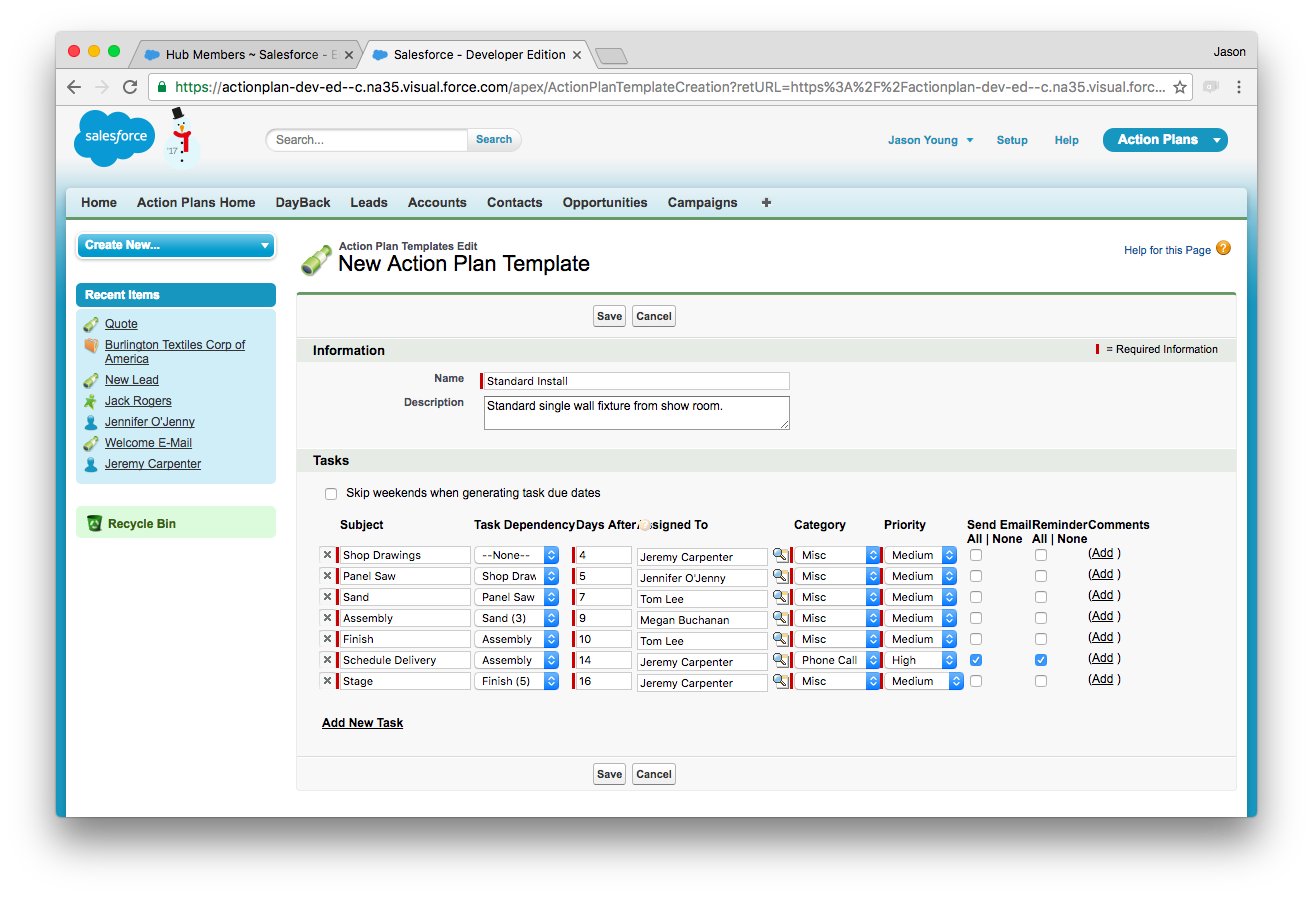
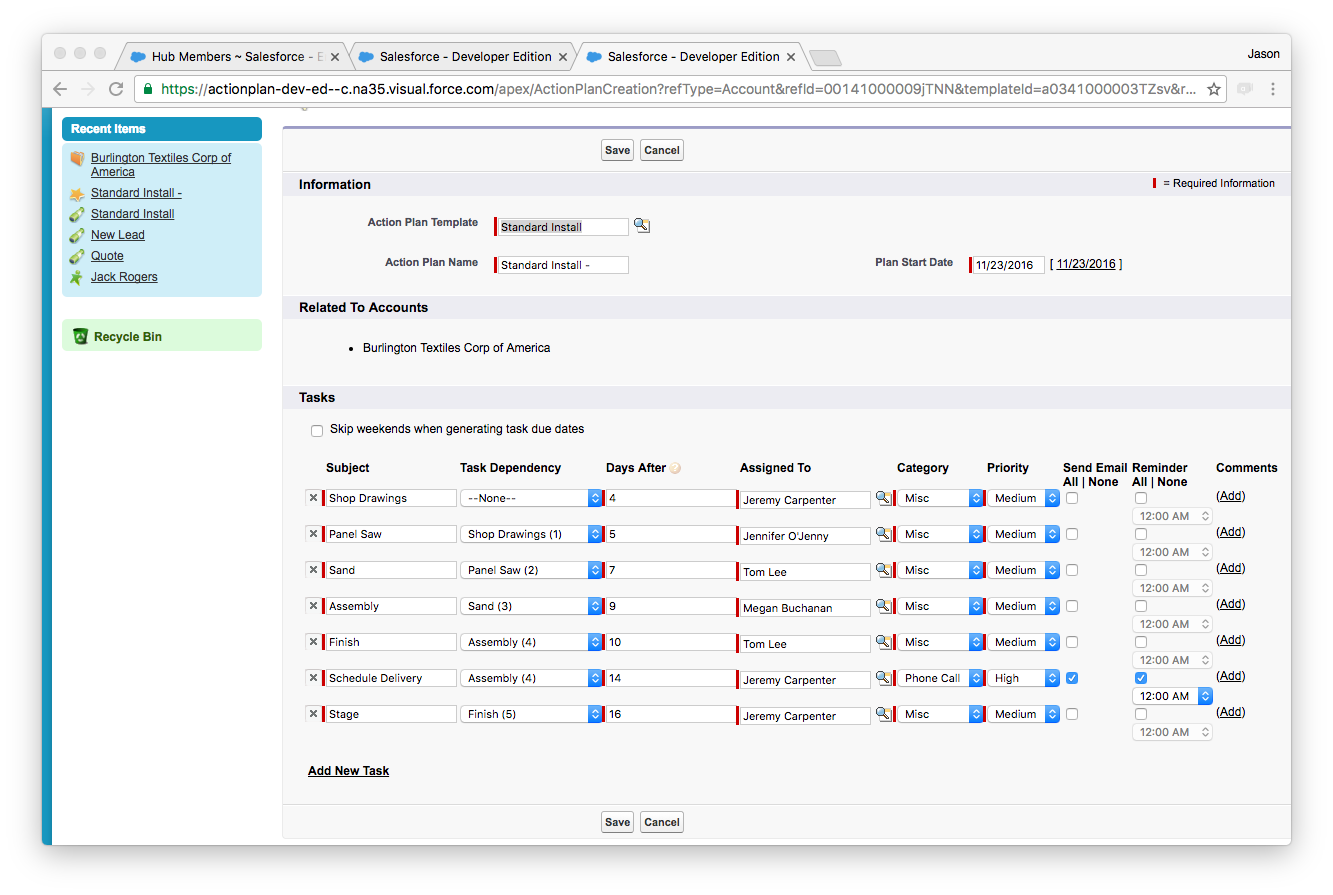
The Template set-up itself is simple, and just consists of a name, description and a series of Tasks. One Plan/Template can have up to 75 Tasks. Dependencies can be established for these Tasks so they won’t be created until the dependency is completed. If a Task has a dependency, then it’s due date will be based on the dependency due date plus the number specified in Days After. If the task has no dependency, then it’s based on the Action Plan start date plus the Days After value. An important thing to note about this dependency behavior is that once the actual plan has started the due dates are fixed, so if a dependency changes it’s due date the dependent’s due date does NOT update to adjust for this change. You need to make that change manually in the active Plan itself or the Tasks if they have already been created.
Setup: Custom Buttons
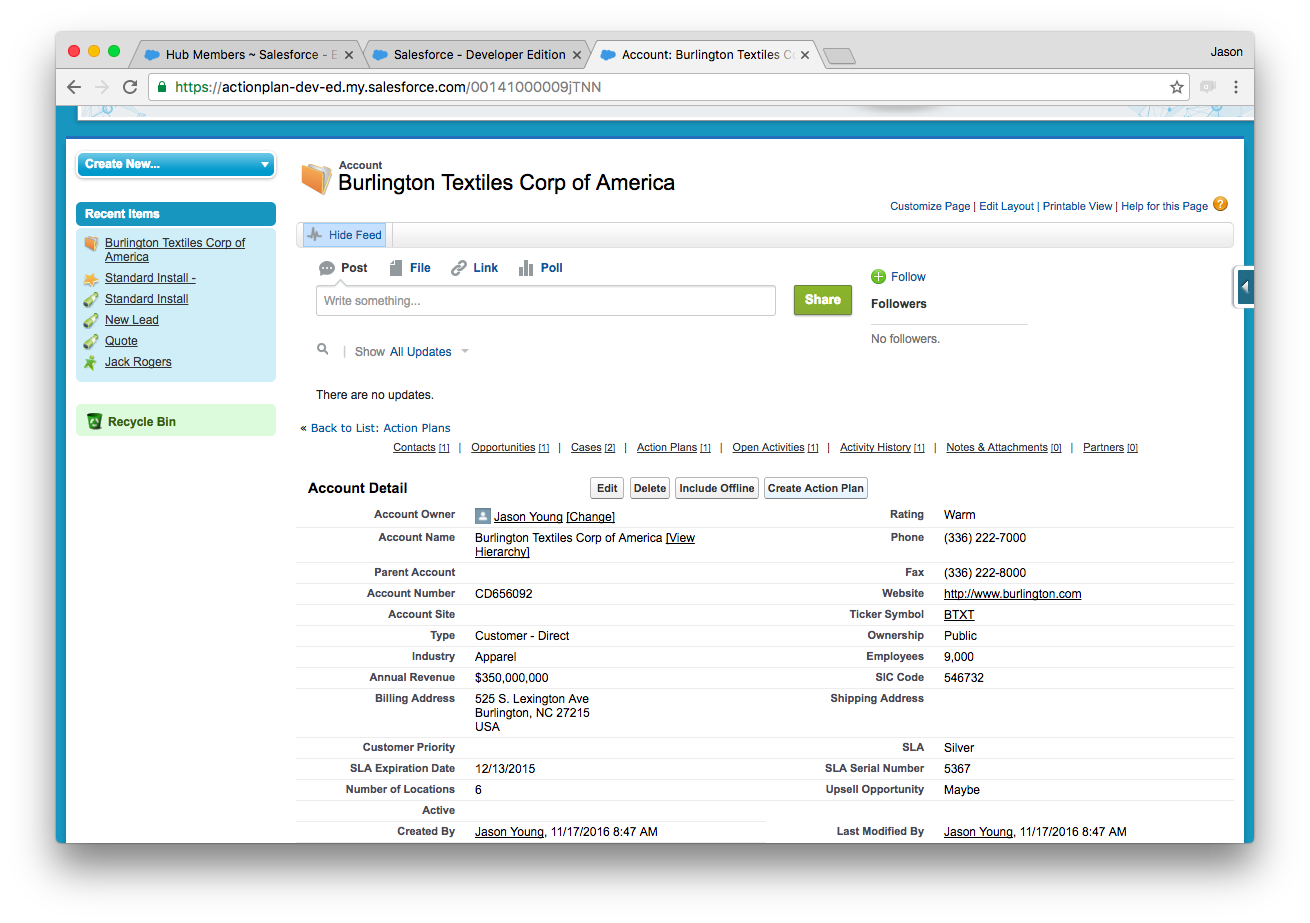
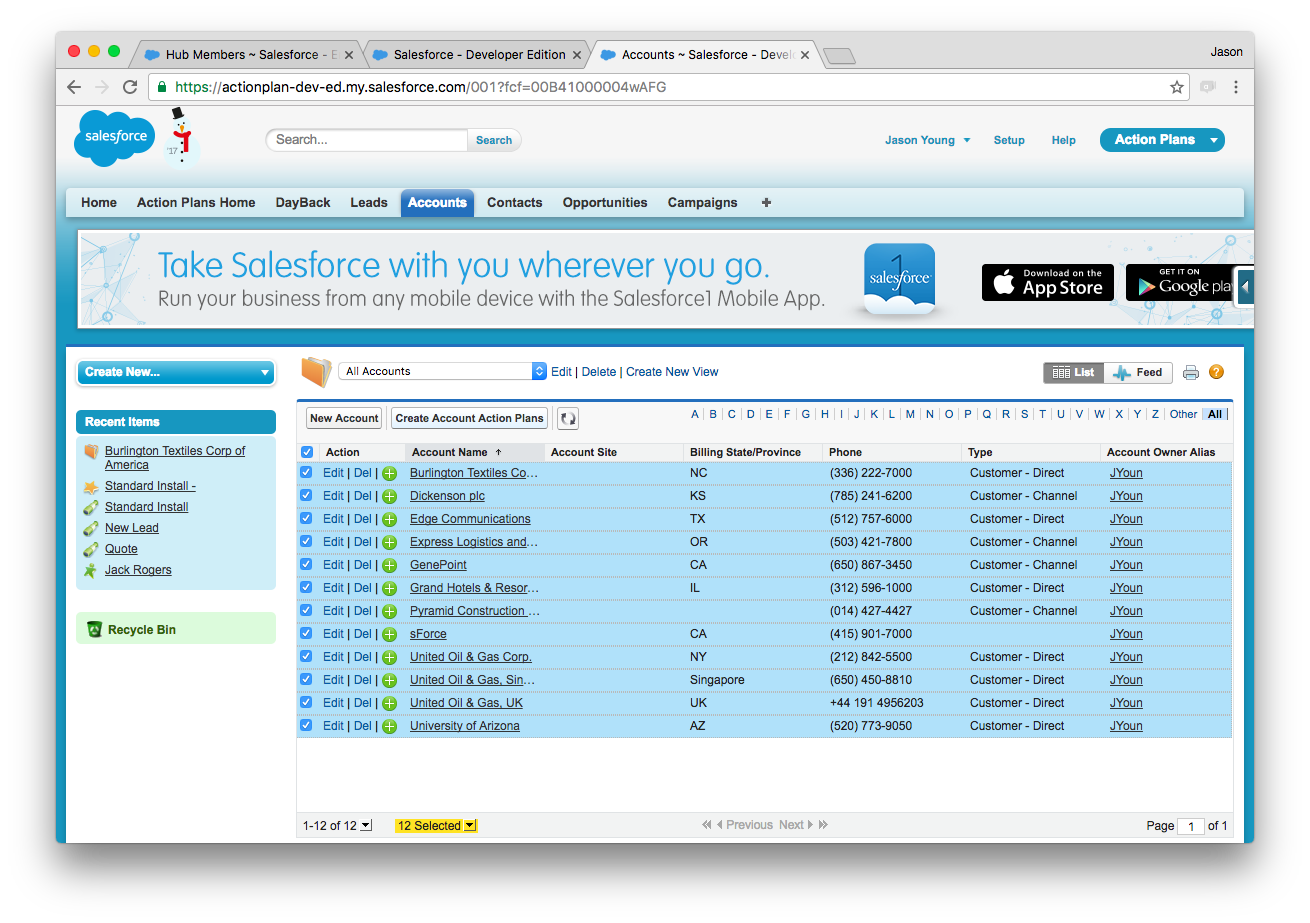
In Salesforce Classic, you can add Action Plan buttons to the list and detail views for the parent objects by dragging the available buttons onto the layouts. This allows you to create an action plan right from the parent.
In list view, the button allows you to create a batch of Action Plans for up to 40 parents at a time, potentially generating 3000 tasks with one click!
Setup: Custom Buttons and Lightning
Action Plans works in Lightning, but the Custom Button options above are not available. Instead, you need to create a Plan from a Template record and then assign the parent to the Plan. Once it’s saved, then the Tasks are created. This means there’s no way to create a batch of Action Plans in Lightning like you can in List View in Classic, but remember, it’s easy to switch back and forth between Classic and Lightning, so being in a Lightning Org shouldn’t prevent you from using that powerful feature.
Creating a Plan
Whether you’re creating a single plan or a batch, when you press the Create button you’ll be brought to a screen where you can then choose your Template and a start date. One of the things I found interesting about Action Plans is that the templates aren’t parent object specific. This means I can use the same Template for generating a Plan for a Contact or an Account. Many plans will only make sense for certain parents, but it’s nice you don’t have to do it that way. Additionally, you can vary the Plan from the Template during creation by adding or removing Tasks or changing the existing ones.
Once the plan is created the Tasks with no dependencies are created, so in our example the Shop Drawings task is the only one created. Once it’s marked as complete, Action Plans will create a new Task for Panel Saw, and so on. Note that a dependency can have multiple dependents, so when Assembly is completed, new Tasks will be created for Finish and Schedule Delivery.
Tasks in DayBack
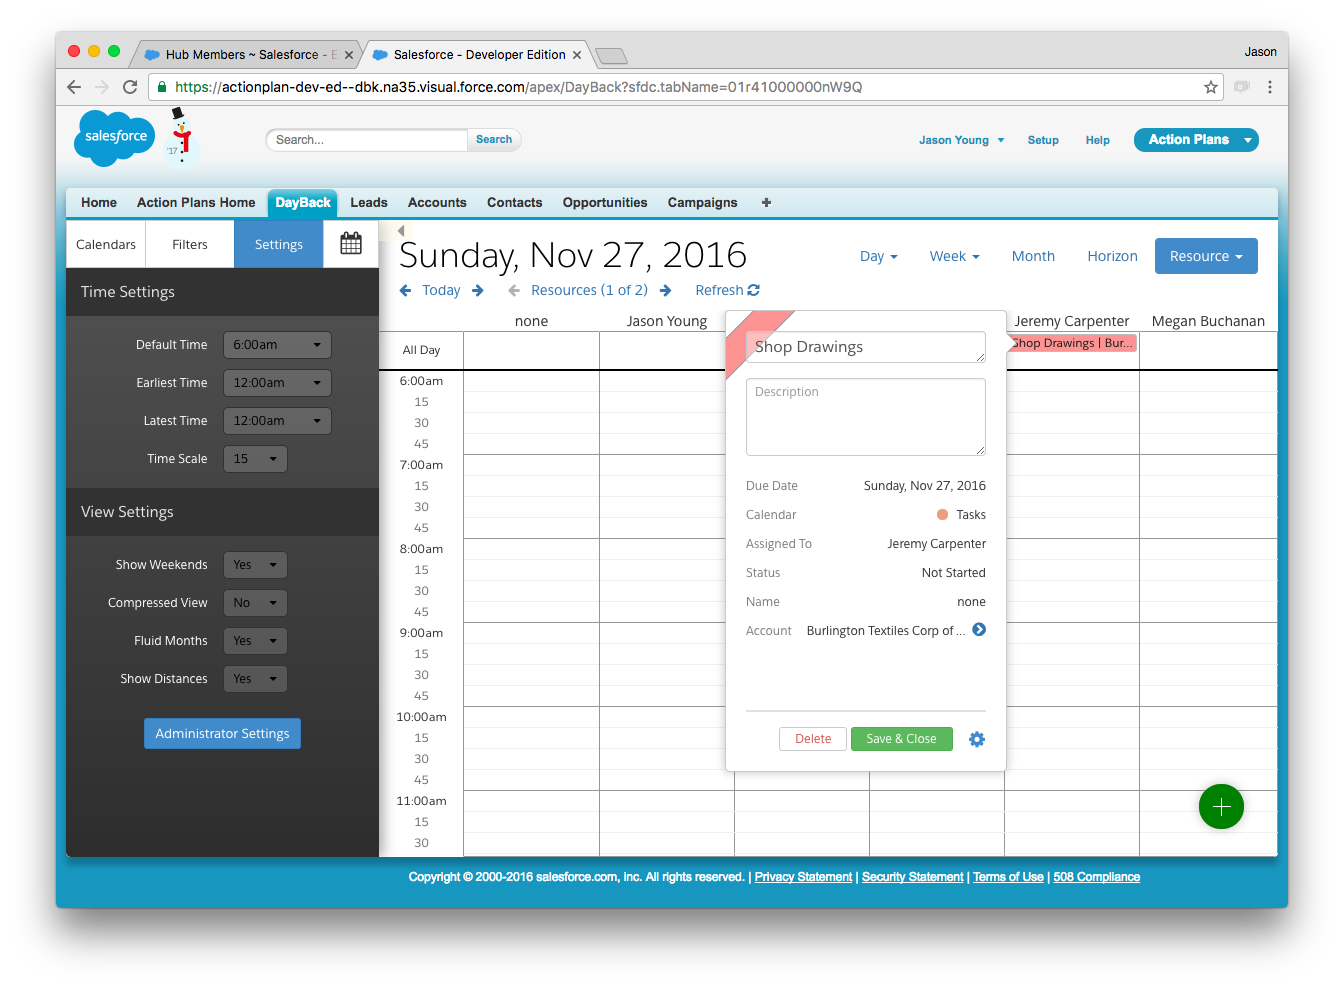
When you install DayBack, Tasks are one of the object that’s already set-up, so there’s not much to do as far as set-up, and we see our new Task in DayBack “out of the box!” Action Plans associates the Task with its parent and that carries through to our Tasks in DayBack so we can see the parent Account and “Jump To” it as needed.
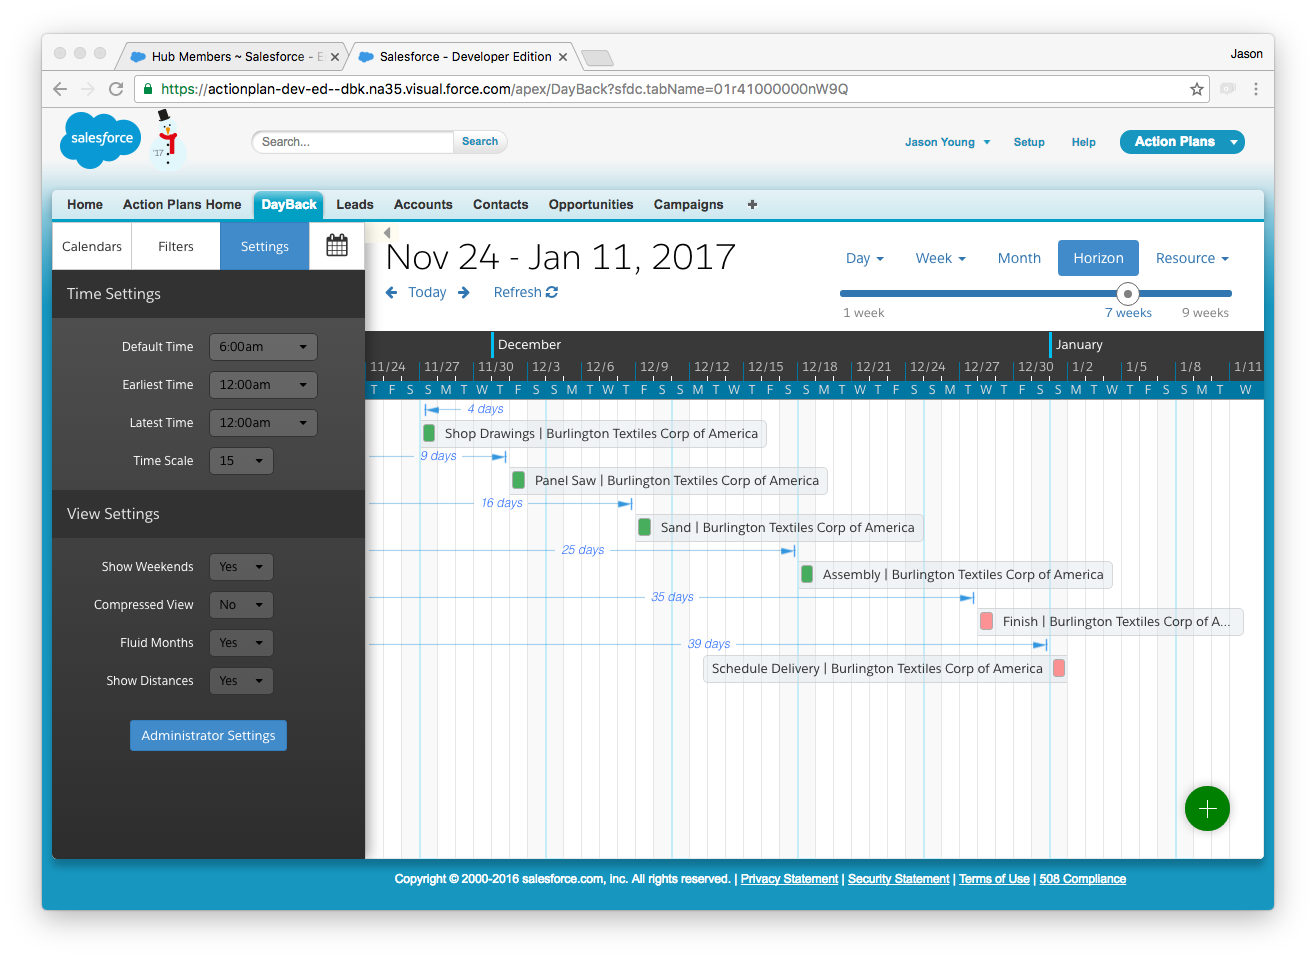
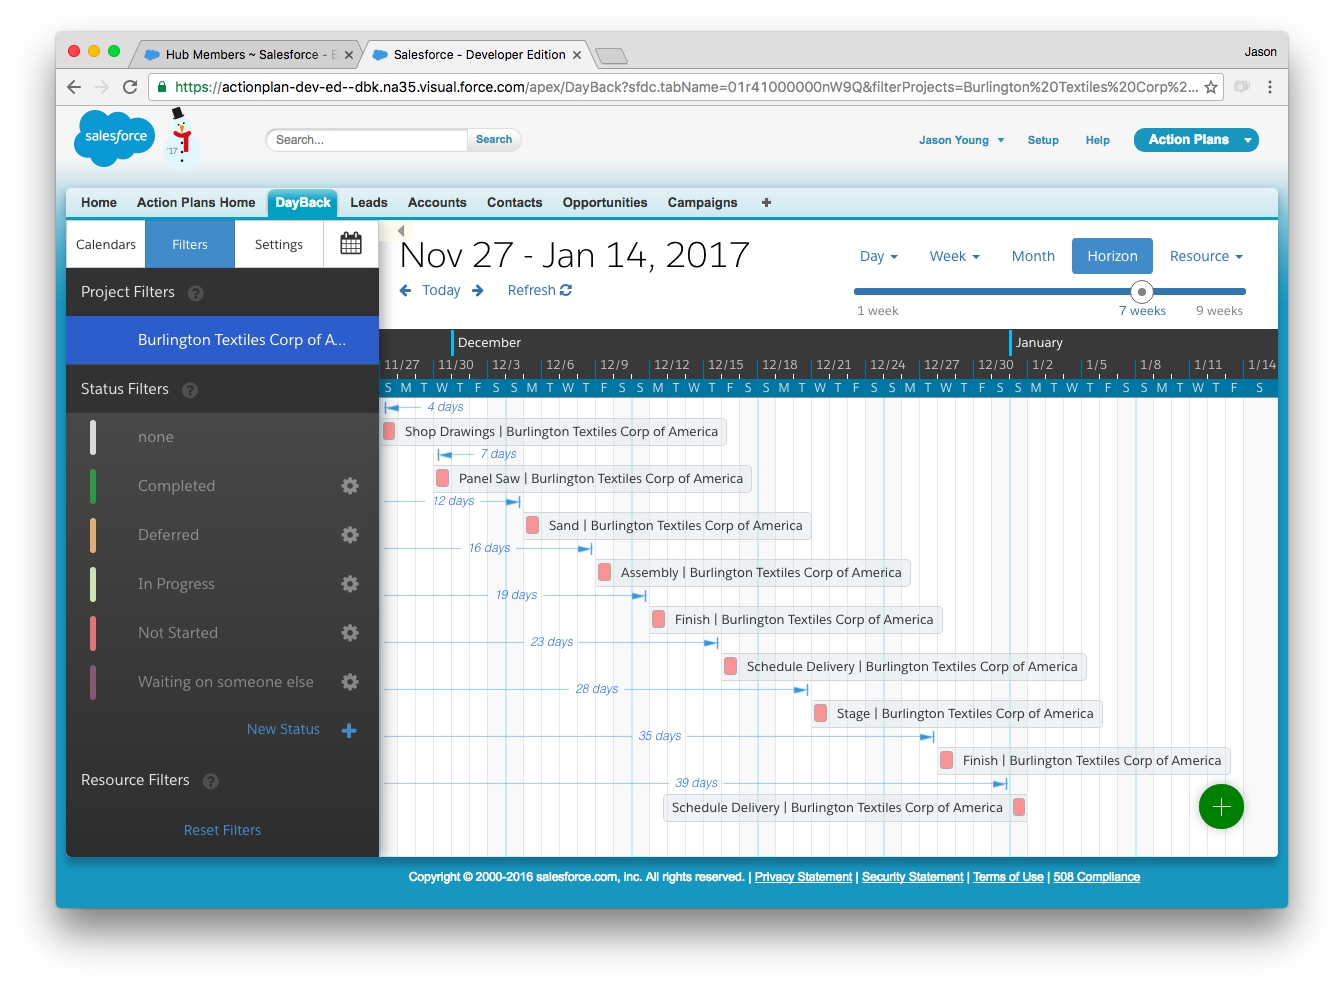
In this example, all of our Tasks, except for the first one, are dependents so we don’t see them in DayBack until the dependencies are completed, but as that starts to happen we can see the Plan take shape. DayBack’s Horizon view is particularly good for this:
Custom Action To Reveal Dependents
Since the downstream Tasks are not created until their dependent is completed, we won’t see those new Tasks in DayBack until we refresh the calendar. One thing we can do to smooth that out a little bit is to add an Event Action to our Tasks to refresh the calendar for us when a Task is marked Complete and then Saved. Event and Custom Actions allow us to perform custom JavaScript from DayBack. It does take little time for Action Plans to create the new Tasks, so a timeout is required in the JavaScript, and depending on how many Tasks are being created, you may need to experiment with what timeout value works. I found 1000 to be sufficient for 1 task, but your mileage may vary. Here’s a sample of the JavaScript for refreshing the calendar in an On Save Event Action:
function refresh () {
  var element = $('.calendar');
  element.fullCalendar('refetchEvents');
}
if ( '[[Status]]'==='Completed' ) {
  setTimeout( refresh, 1000);
}
See the Whole Plan
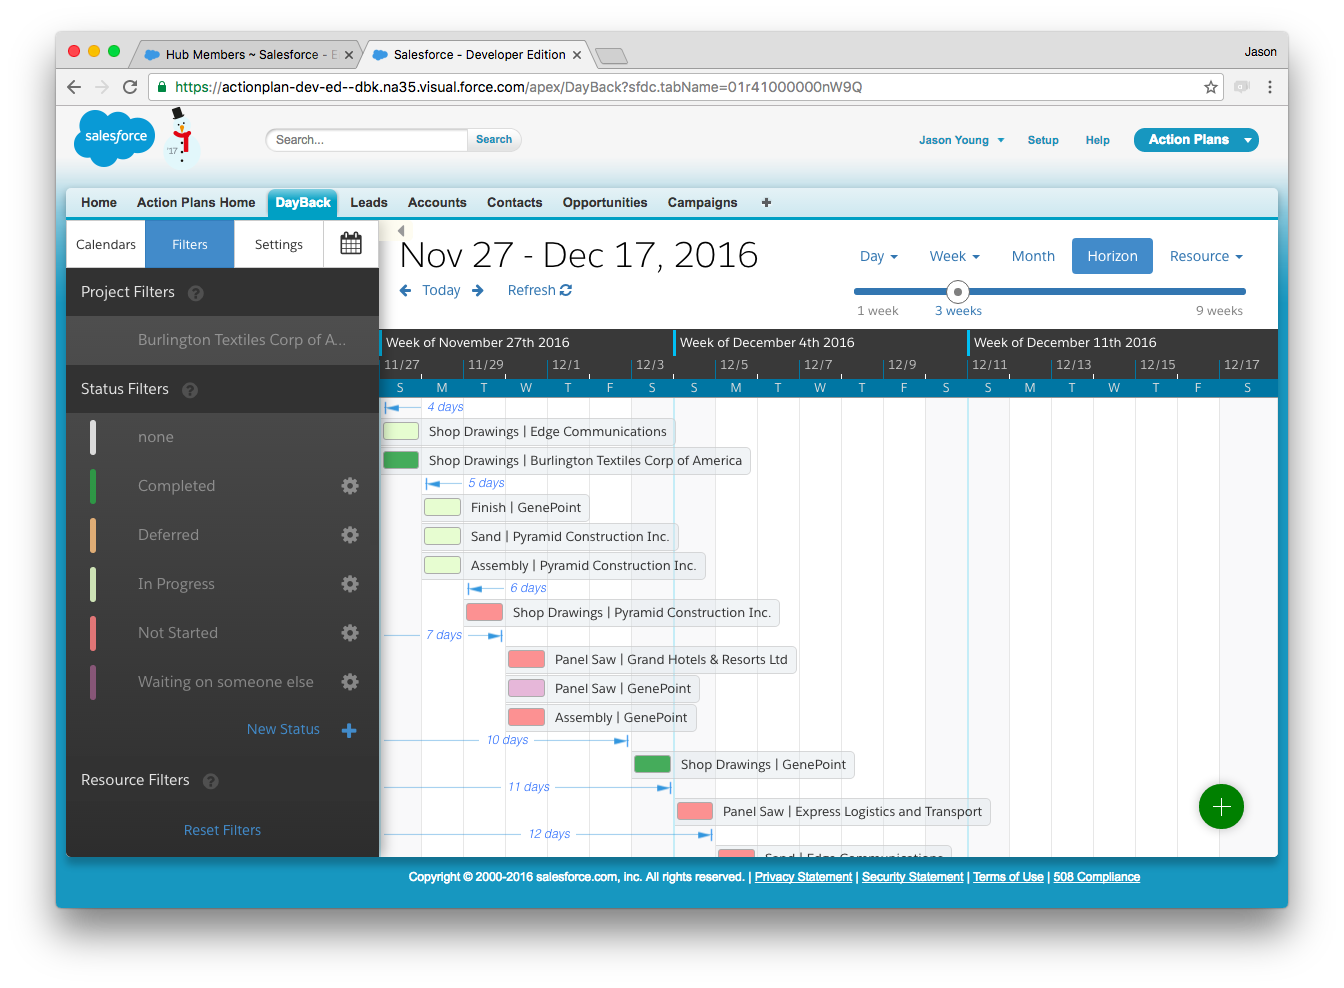
If we want an overview of the whole plan in DayBack right from the start, then we probably want to set up our Tasks with no dependencies and estimate all the due dates based on the Plan’s start date. Since these dates are static after plan creation anyway, we don’t lose much in functionality. We can also make sure we’re focussed on a single parent’s plan by filtering on a single entity as described here.
Or with filters off, we can get an overview of the Tasks from all our Plans:
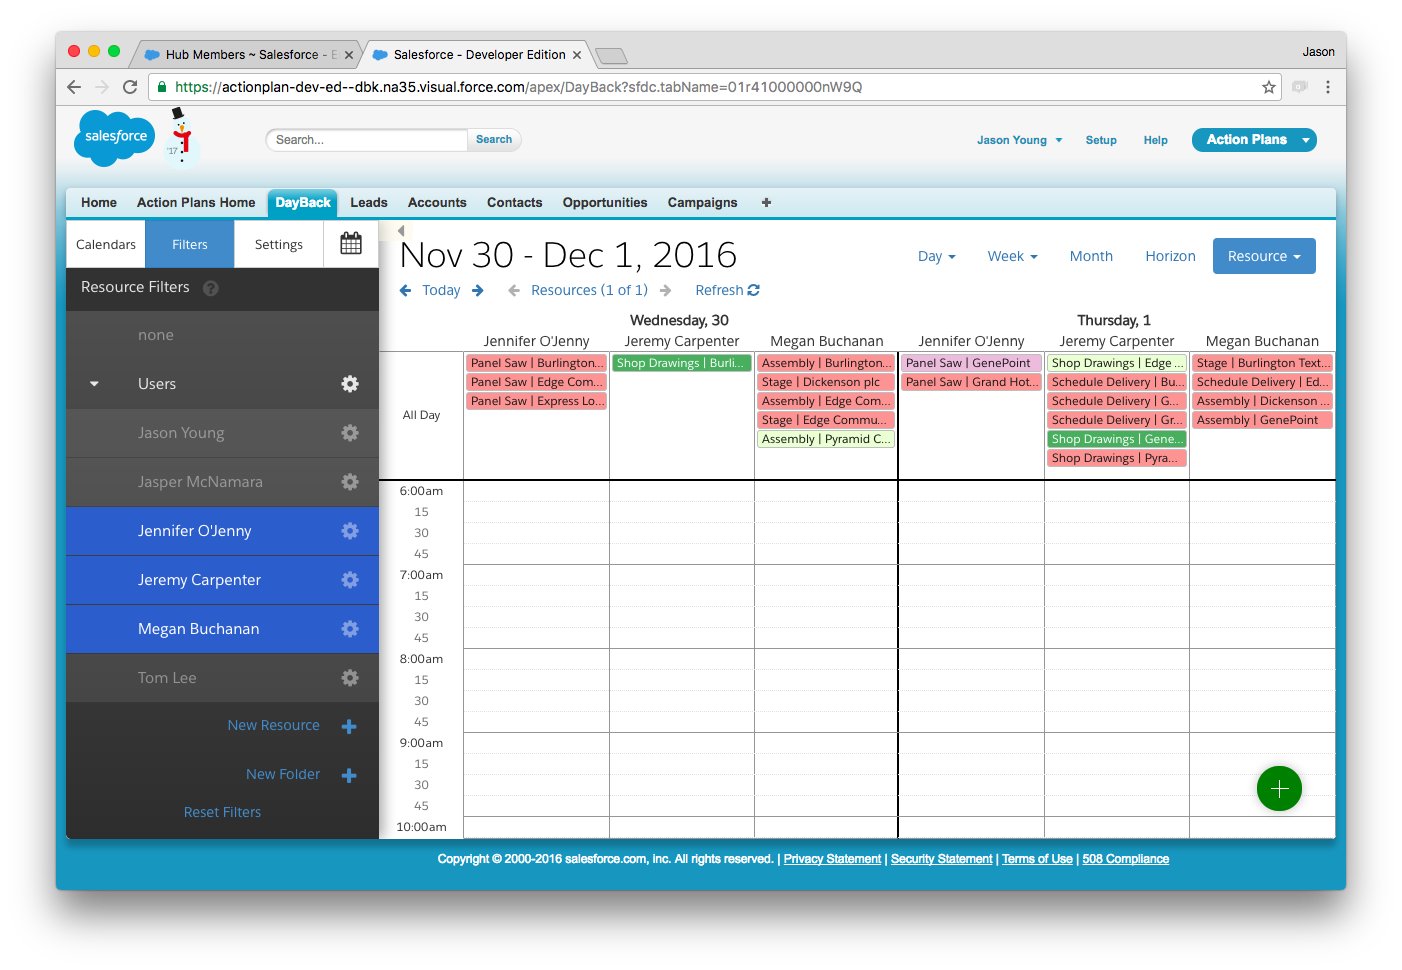
Resource view also gives us a quick view into our Task assignments to make sure our users aren’t over or under allocated:
See The Plan, Know The Plan
Although Action Plans’ method for setting up Templates and Tasks is intuitive and easy to use, there’s no easy way to visualize what those plans will look like in production. Particularly when you potentially have complex Templates generating new Plans and Tasks continuously. This is where DayBack really shines. You can see these Tasks hit the real world in traditional calendar views, but also get a visual sense of capacity and duration from DayBack’s Resource and Horizon views. People who have a lot of experience scheduling may not recognize a problem when the Tasks are in a simple list, but once they’re on a familiar schedule view, the problems jump out at them immediately. Additionally, DayBack’s ability to easily reschedule these Tasks via drag and drop allows the scheduler to correct and refine the Tasks immediately.
Leave a Reply