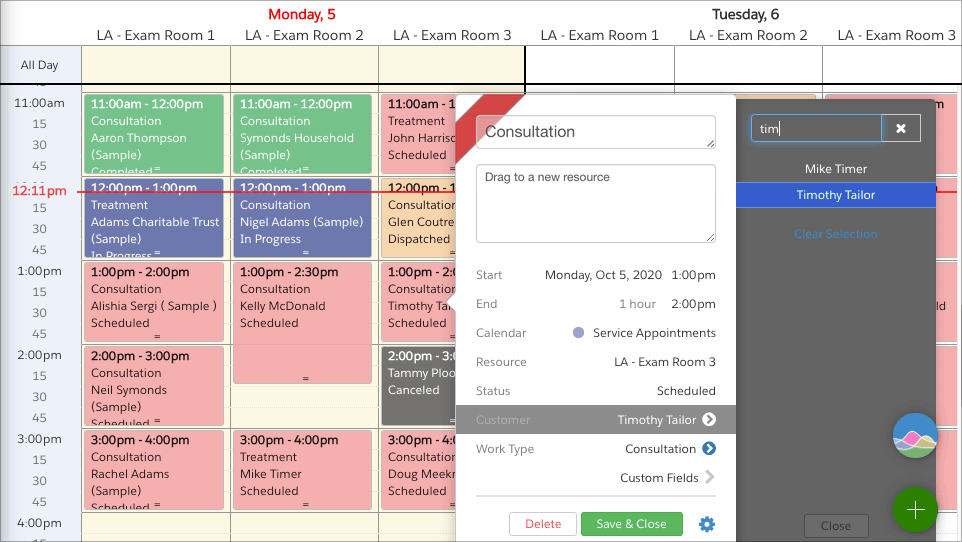
This is the first of two articles on using DayBack Calendar with Salesforce Scheduler. DayBack can be used to visually schedule Salesforce Scheduler’s Service Appointments with an elegant drag-and-drop interface, custom workflows, and scheduling analytics.
A Better Service Dispatch Console for Salesforce
In this article, we’ll look at working with relating Salesforce Scheduler’s Service Appointments and Service Resources. In future articles, we’ll look at displaying resource availability and scheduling across different timezones.
If you’re interested in seeing how DayBack and Salesforce Scheduler work together, you can start a Salesforce Financial Services trial, which includes the Lightning Scheduler. Then install the free trial of DayBack from its Appexchange listing. Both trials are available for 30 days.
Need help? The instructions and example code that follows is designed to show you how this customization works and to let developers add this to their own deployments. If you’d rather we deploy this for you, we can customize this feature and add it to your DayBack as part of an implementation package. Just get in touch.
Basic Relationships in Salesforce Scheduler
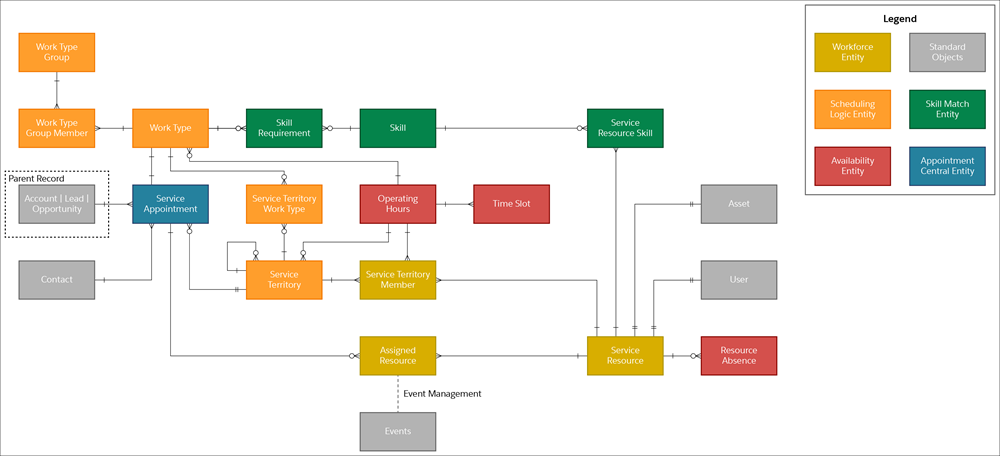
DayBack focuses on the Service Appointment object in Scheduler.

Service Appointments use two primary related fields, The Parent Record Id and the Work Type Id. This works perfectly for DayBack, which provides two standard related fields with the ability to do look-ups. In this example, DayBack’s Contact field is mapped to the Service Appointment’s Parent Id, and DayBack’s Project field is mapped to the Service Appointment’s Work Type Id.
Loading Resources at Startup
Since DayBack will be using the Service Resources from Salesforce Scheduler, DayBack can use an “On Resources Fetched” Custom App Action (code below) to query the Service Resources and load them dynamically at start-up. This way, all updates can be done on the Salesforce side and there will be no need to maintain resources manually. Additionally, DayBack can query the related Service Territory that’s associated with the Service Resource and organize them in folders based on the Service Territory. In this simple example, the Salesforce org has two Service Territories (Los Angeles and New York), each with three related Service Resources (Exam Rooms 1-3). When DayBack loads, the resources will be reflected accordingly.
The other benefit of loading the resources from Salesforce Data is that both the resource name and resource id can be captured as part of this process. This will save some work later on when DayBack needs to edit a Service Appointment’s resource information.
Here’s the code for an On Resources Fetched action to load Lightning Scheduler’s Service Resources by Service Territory.
ResourceScheduler_LoadResources.js
Resources in the Salesforce Scheduler Join Table
DayBack can reflect related fields for resources relatively easily when the relationship is a standard Look-Up or Master-Detail. In these cases, a formula field can be added to the object to display the related value, and then an On Event Save Custom Event Action can be used to look up the id. With the id, the related key field is then updated accordingly. The Looking Up A Resource ID By Name (Salesforce) example here is a good example of implementing this technique.
However, the relationship between Service Appointments and Service Resources is more complex. Instead of a Look-Up or Master-Detail, it uses a join table called Assigned Resources, which allows multiple resources to be related to a single Service Appointment. The On Save action needed here will need to create and update the Assigned Resources records instead of just updating a single key field. This is a little tricky, but certainly doable.
A new custom text area field will need to be added to the Service Appointment object. This will be mapped as the resource field in DayBack. When this field is edited in DayBack, the On Save action will do the following.
If this is a new assignment, then the appointment needs to be created first. Since the Assigned Resource relationship to the Service Appointments is a Master-Detail relationship in Salesforce, the Appointment must exist to create the Assignments. Once the Appointment is created successfully, then the Assigned Resources can be created. Once each join record has been created, the On Save action is allowed to complete, showing the creation toast notification record. When the appointment is examined on its native layout, the Assigned Resources section is then populated.
If the appointment already exists, but the resources are changed in DayBack, then the existing Assignments need to be compared to the new ones specified in DayBack. When there are the same number of Assignments, then the current Assigned Records can be looped through with the new resource values. And if the number of resources has changed, then the Assignment records will need to be added or deleted accordingly to keep everything in sync. Fortunately, Assigned Resource records can have the Service Resource Id updated, so deletion and creation are not always required during an edit.
Since the On Resources Fetched action has written both the Service Resource Name and Id to DayBack, the On Save action can find the Service Resource Ids needed from memory rather than asking Salesforce for the Ids. This keeps the On Save Action itself from being more complicated than it already is.
Here’s the code for an On Event Save action to maintain the Assigned Resources records based on a resource edit in DayBack.
ResourceScheduler_OnEventSave.js
Resource Scheduling – Edits Made Outside of DayBack
Although DayBack’s On Event Save action will update Salesforce data accurately, what about edits going the other way? If Appointments are being created outside of DayBack with Assigned Resources, DayBack’s custom field must be updated to reflect the resource assigned. For this, Apex Triggers can be used on the Assigned Resource object to capture if an Assigned Resource is created, updated, or deleted. This will ensure the related Assigned Resource records and DayBack’s stay in sync without any extra work for the user. Here are the example triggers for this.
ResourceScheduler_InsertUpdateTrigger.txt
ResourceScheduler_DeleteTrigger.txt
The test class for code coverage on both of these triggers can be downloaded here.
Conclusions –
Taking advantage of DayBack’s custom actions, significant customizations can be made to the calendar to reflect Salesforce Scheduler’s somewhat complex data model for Service Appointments and Service Resources. With these customizations in place, your users can utilize all the native functionality provided by both these apps seamlessly.
In our next article, we’ll examine using DayBack’s Availability Scheduling to easily show when Service Resources can be scheduled.


Leave a Reply