
In this article
- Overview
- Add this to your org
- Remove the integration
- Troubleshooting and Support
- Hosting the DayBack Meetings Service yourself
Overview
Having switched from GoToMeeting to Zoom, we’re having a lot more meetings with customers since Zoom makes it so easy for new users to join the meeting. That means we have a lot more meetings to schedule and we needed a way to see our existing meetings on the calendar and to prevent conflicts between meetings. Fortunately, custom actions in DayBack make it easy to manage our Zoom meetings from Salesforce or another calendar source, like FileMaker, Google, or Basecamp.
Schedule Zoom Meetings from Salesforce
Custom actions in DayBack Calendar let you add buttons to events in the calendar. These buttons extend the calendar’s capabilities they’re great for connecting your calendar to with third-party applications like Zoom.
With custom actions, we’ve created buttons to schedule, start, and delete meetings. These actions also listen to DayBack events and reschedule Zoom meetings when you drag a meeting to a new time; they’ll also warn you if your new meeting time conflicts with another Zoom meeting.
Here’s a video of it in action: https://vimeo.com/287123175
Benefits – Visual Rescheduling & Conflict Detection
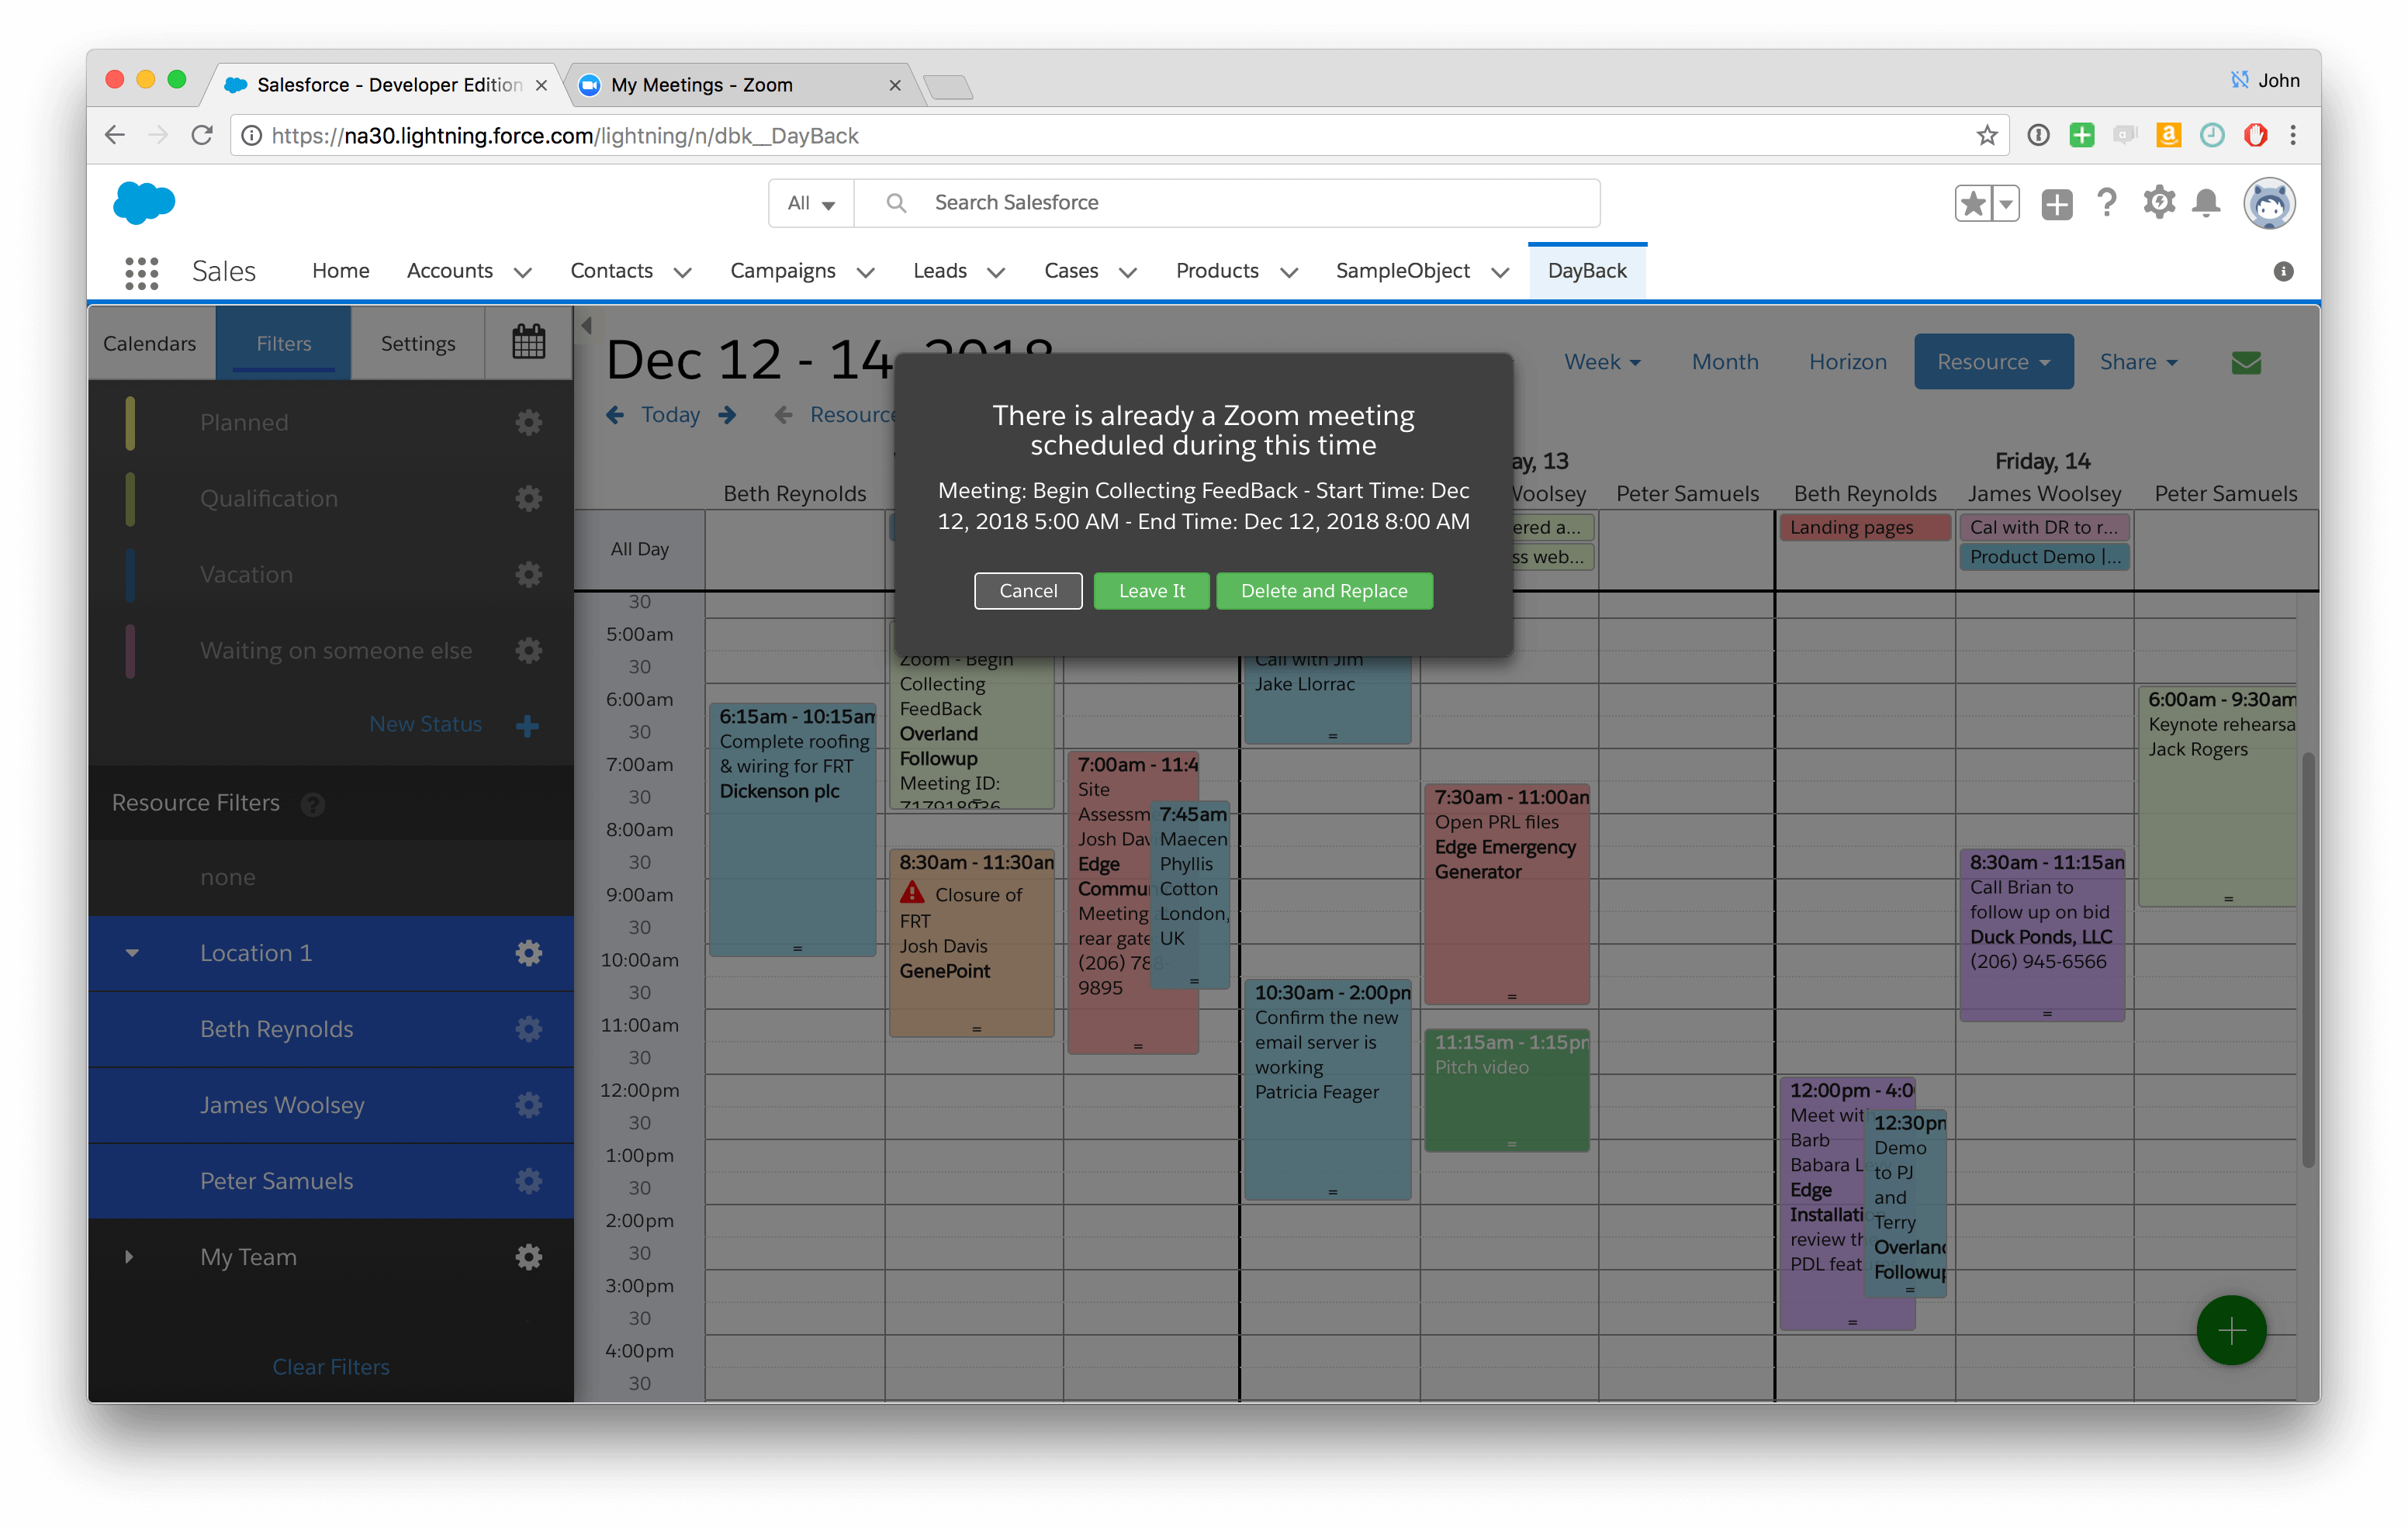
Seeing your Zoom meetings in the context of your other commitments is the whole point of working with Zoom inside Salesforce. It’s even more important when rescheduling meetings: drag your meeting to a new spot on the calendar and DayBack checks to make sure there are no conflicting Zooms at that time. If you’re using more than one Zoom account, DayBack keeps track of which account is used for each meeting and only considers meetings within the same account to be conflicts.
(Need conflict detection more broadly in your Salesforce calendar–not just for Zoom meetings? Check out this mod to DayBack Calendar: conflicting events in Salesforce.)
Update April 3, 2020
The DayBack Meetings Service was designed so that, most of the time, all changes could be made on the middleware (service) end without having to upgrade the actions on the client-side. Today’s updates make some security changes that need to be implemented on the client end. To do this, you’ll download an updated copy of the custom actions, then follow the instructions below to paste the new code into your existing actions.
If you have your own private instance of the DayBack Meetings Service setup, you’ll want to re-deploy to your Zeit instance following the instructions here. You don’t need to repeat step 3, as these keys are already stored in your Zeit environment, but step 4 adds a new “dmscKey” encryption key, which you will need to follow in order for the service to function. You can also pull the updated code for the meetings service from the GitHub repository here.
Here’s a list of the new features in this update:
- Switched to using a new window, rather than an iFrame for the login process.
- Performance improvements in middleware service.
- Updated zoom login window size to accommodate new login methods.
- Using encrypted cookies for storing tokens on the client.
- Updated backend API calls for Zoom to accommodate upcoming changes.
Instructions: Add This to Your Org
Communication between DayBack in your browser and Zoom’s servers requires connecting through the DayBack Meetings Service. This service does not store any data and is only used to create, update, and delete events in your Zoom account.
If you’d prefer to host this service on your own, instructions for that can be found at the bottom of this blog here.
Here’s how to add this capability to your copy of DayBack Calendar.
1. Download the Custom Actions
Custom Actions in DayBack are written in JavaScript, so they are pretty easy to modify if you want to change the default behaviors. You can use the ones you’ll download here with no modification.
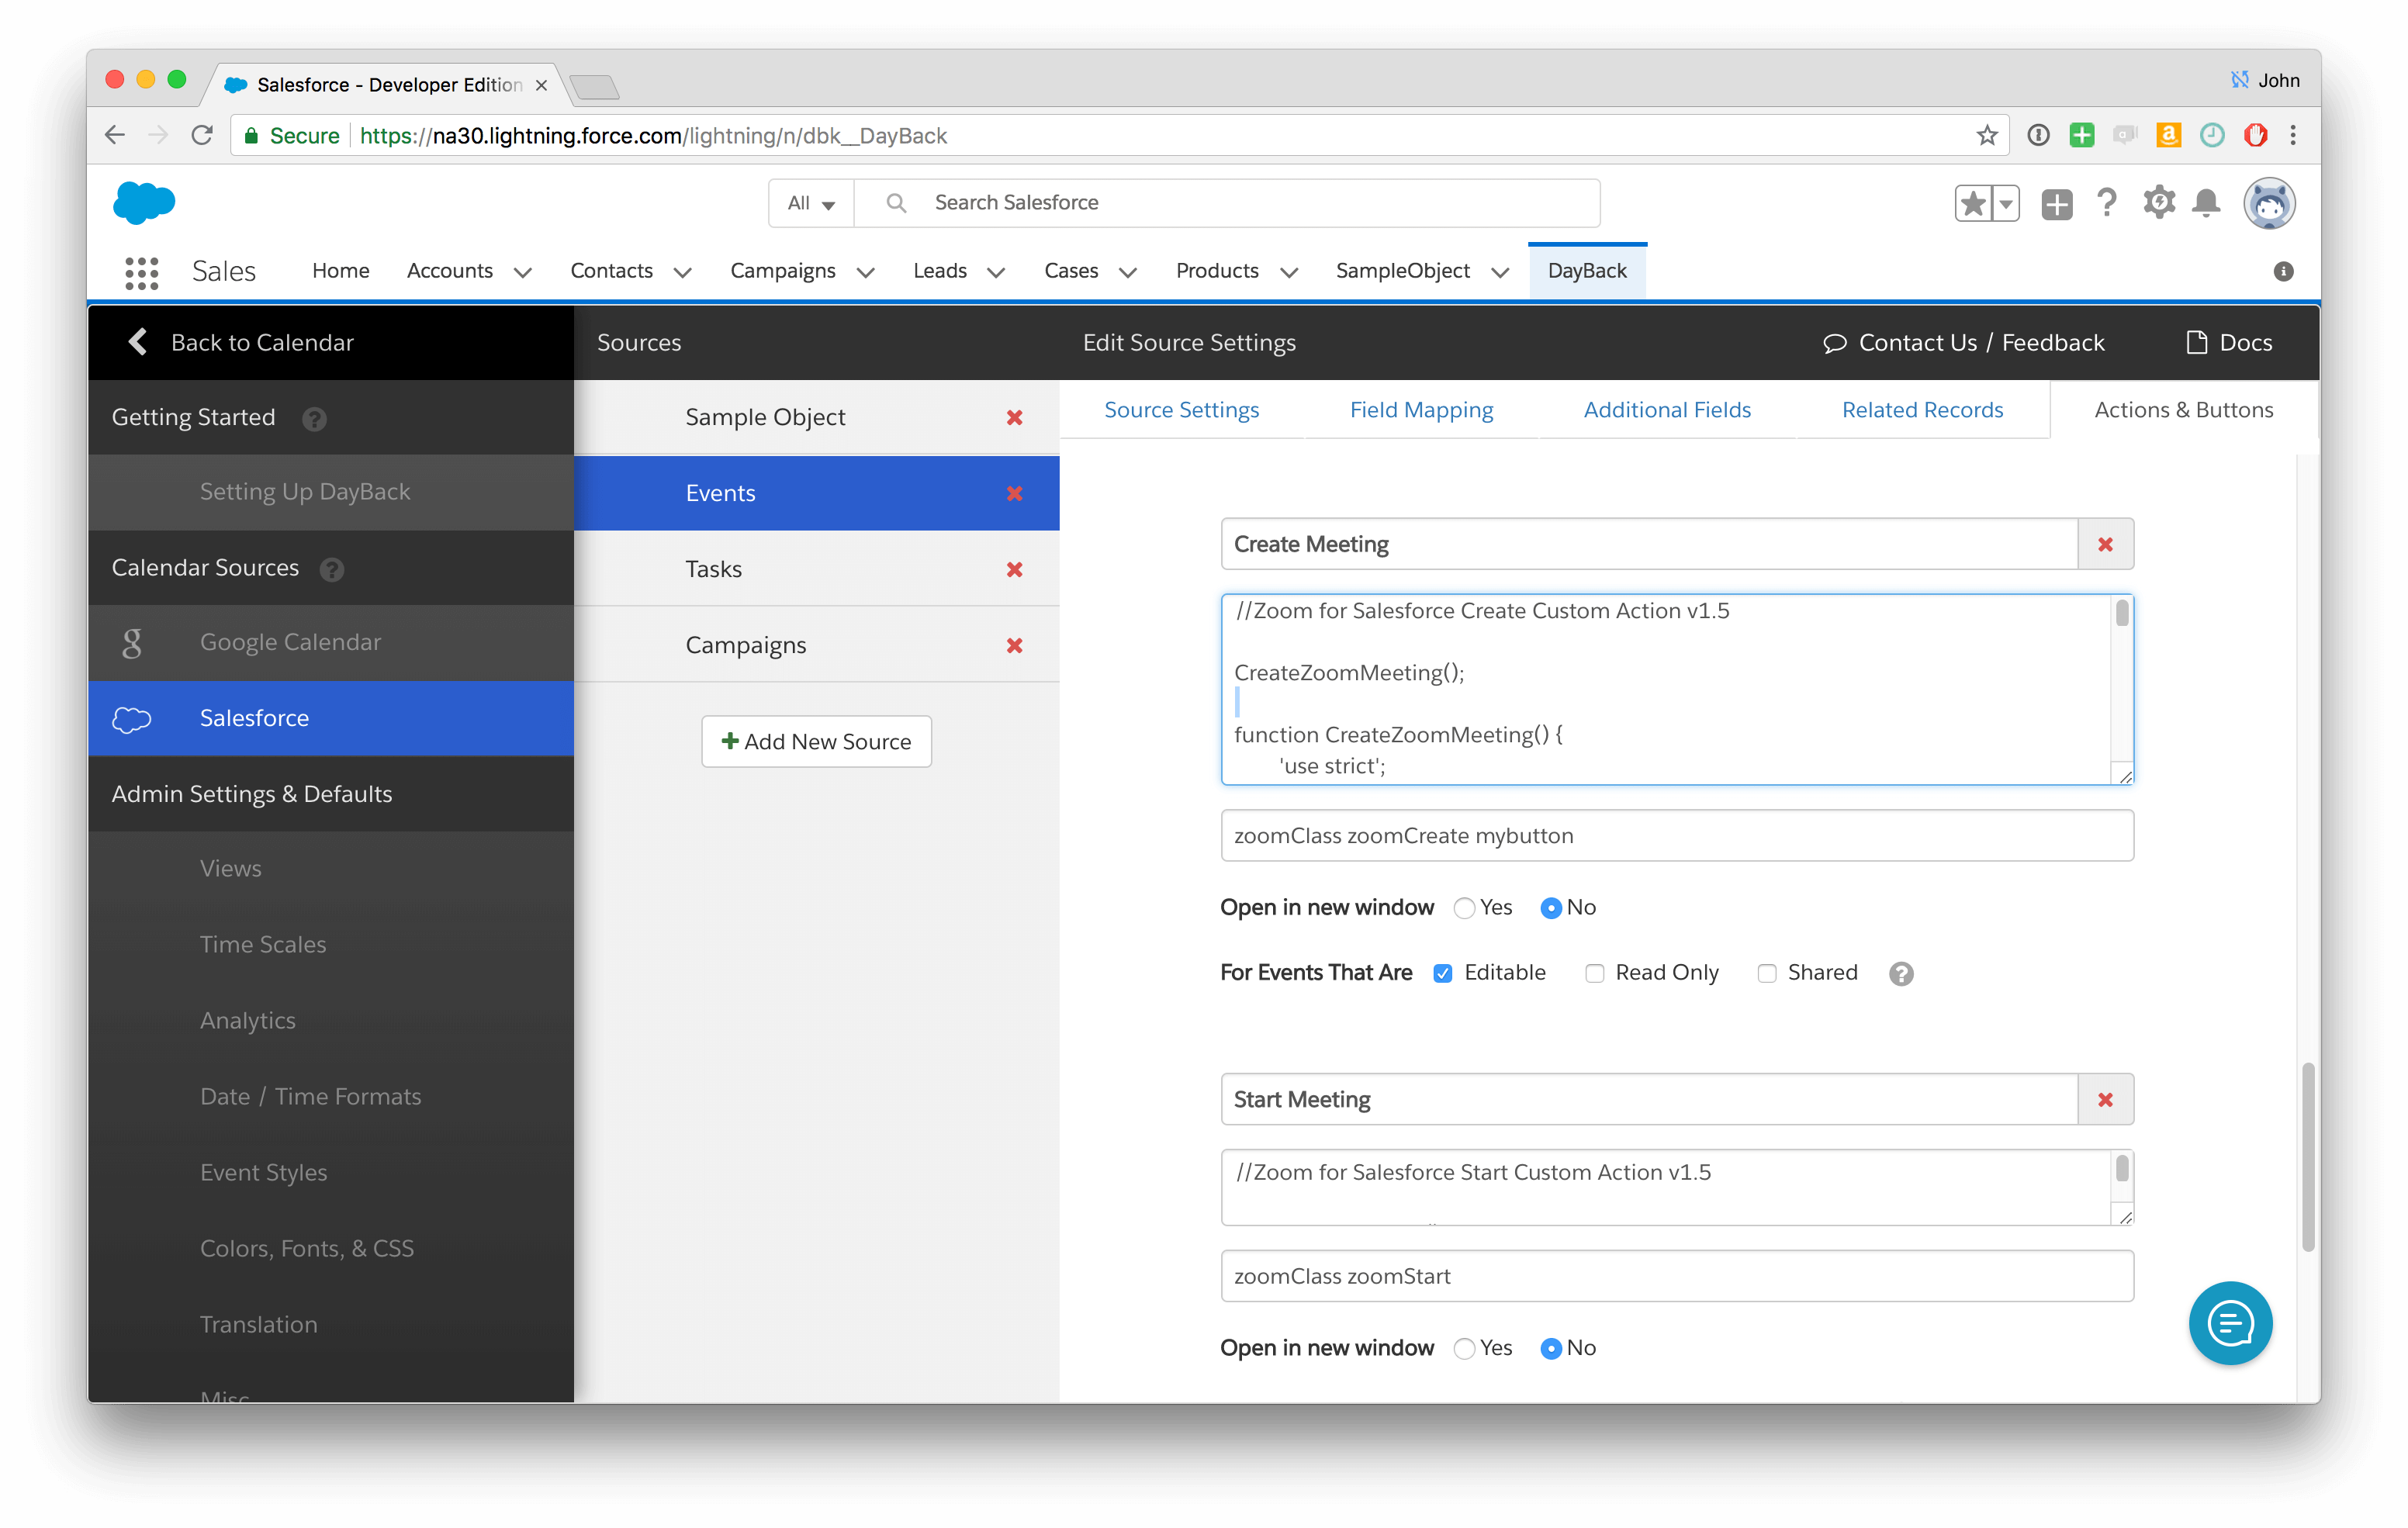
The fully featured integration shown in the movie above requires three custom button actions and two custom event actions, giving you conflict detection and resolution, and making sure rescheduled events sync to Zoom.
Here’s the list of files you’ll need in the next step (download them here). The .zip contains a couple folders; you’ll want the files in the “Custom Actions” folder.
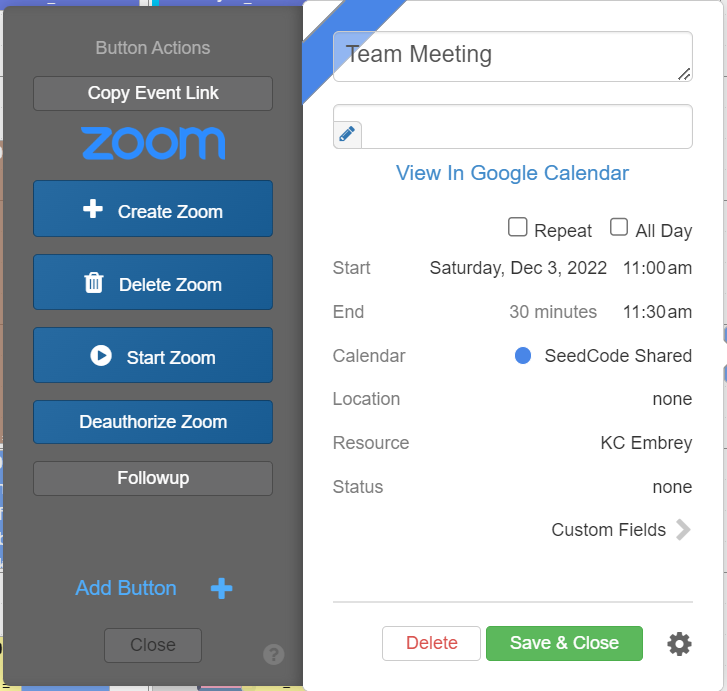
- Create – Custom Button Action – Handles the creation of new meetings
- Delete – Custom Button Action – Handles the manual deletion of existing meetings
- Start – Custom Button Action – Starts a meeting if the details exist in the event description
- Deauthorize – Custom Button Action – Deauthorizes DayBack from your Zoom account
- EventDelete – On Event Delete Event Action – Checks if the meeting details exist and prompts you to delete the meeting
- EventSave – On Event Save Event Action – Checks if the event time has changed and prompts to update the Zoom meeting accordingly
As you may notice, all of these custom/event actions look the same except for one line in the code. That’s because, with the implementation of the DayBack Meetings Service, we’ve been able to move most of the logic to the service itself and the custom actions actually are all the same except for the “action” that they request the service to perform. Supported actions, which are shown in the comments of the code, include:
- create
- delete
- start
- deauthorize
- eventdelete
- update
2. Add the Actions to DayBack
Add these scripts to your DayBack app by going into the Administrator Settings, choosing your calendar source (this works with both native and custom Salesforce sources) and pasting each file’s contents into a new event or custom action field. For the event actions, you’ll select the type of action in the dropdown (On Event Save or On Event Delete). For custom actions, you need to give each one the name that you would like to see on the custom action button. The options to select are noted in the comments at the top of each file. Check out our documentation on custom actions here for more information.
That’s it! Return to the calendar and start scheduling meetings =)
Usage
When you first try to create, edit, or delete a meeting through the DayBack custom actions, you’ll be presented with a login prompt that looks like this:
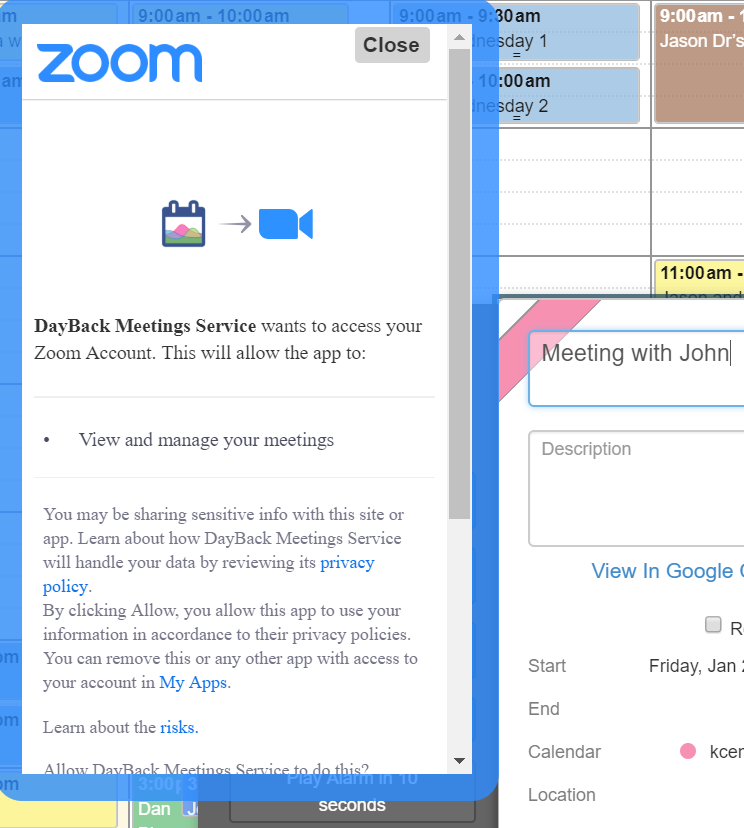
This is where you’re authenticating DayBack to connect to your Zoom account. Once you’ve logged in and authorized the DayBack Meetings Service with Zoom, you’ll be connected and the custom actions will function without needing to authorize again.
Refer to the video here for a demonstration of the new functions now available in your calendar.
Keep in mind that the custom actions will use the Zoom account that you’re logged in to with the browser to authorize with the DayBack Meetings Service. If you’re not already logged into Zoom in the browser, you’ll be prompted to log in when you use a custom action the first time.
If you need to change the account you’re using, you can click the “Deauthorize” custom button action, and log out of Zoom in your browser. Once you use a Zoom custom action again, you will be prompted to log in to Zoom.
Removing
Removing the Zoom integration from your DayBack calendar requires the following two steps:
- Click the “Deauthorize Zoom” button to deauthorize the service and remove your encrypted key from your browser’s storage.

- Remove the event and button actions that were added to DayBack above.
Troubleshooting/Support
The Meetings service will display any errors returned from Zoom. If you are presented with any errors, we’re more than happy to help you troubleshoot. You can reach out to us here and should hear back within 2 business hours (8 AM – 6 PM P : https://dayback.com/contact/
Hosting the DayBack Meetings Service Yourself
The DayBack Meetings Service is a small web service built in Node.JS. We built it to run as a Zeit application, so if you’d like to run it yourself, you’ll want to learn more and sign-up for a Zeit account here.
You’ll also need your own OAuth API credentials with Zoom in order to authorize your application.
1. Download the files
Deploying the files is quite easy. First, you’ll need to install “Now” from Zeit. Then, extract the “Service” folder from the files download above to a location of your choice.
You can dive into and modify the “index.js” code all you’d like, but to start, it would be best to leave it as is for now.
2. Customize the service for your deployment
Next, open the “package.json” file, which contains the details for this service, and modify the values for “name”, and “description” appropriately. Name and description can be whatever you’d like to call your service.
Open the “now.json” file and change the “name” and “alias” appropriately. “Name” should match the same value you entered in your “package.json” file. The “alias” needs to be unique to Zeit and is the address you’ll point your custom actions to in the next step.
3. Add your Zoom API id and secret to your Zeit environment variables
Open a command prompt (Windows) or terminal window (Mac) and navigate to the folder where you extracted the files.
Next, enter the following commands, one at a time, replacing the last value with your id or secret provided by Zoom:
now secret add zoomID YOURZOOMID
now secret add zoomSecret YOURZOOMSECRET
This will securely save these values into your Zeit environment variables for use in the service without directly entering the values into the code. Any time you need to update/replace your Zoom API credentials, you can update the Zeit environment variables with the same commands
4. Create and add your unique encryption key
Version 5.0 introduced storing API keys on the client in encrypted cookies. You’ll need to create a unique 32-byte key to encrypt and decrypt these cookies. There are many ways to do this, so here’s a document on a few options: https://docs.particular.net/nservicebus/security/generating-encryption-keys
Once you’ve created your unique key, save it to your Zeit environment by entering the following on the command line, replacing the last value with your unique encryption key:
now secret add dmscKey YOURENCRYPTIONKEY
5. Deploy your service
Open a command prompt (Windows) or terminal window (Mac) and navigate to the folder where you’ve extracted the service files, and run the deploy.cmd (Windows) or deploy.sh (Mac) file to deploy your service. This will create a new private instance of the service and deploy it at the alias specified in your “now.json” file.
Once the deployment is complete, verify that your new service is running by going to the alias address you specified in a browser. If you see “DayBack Meetings Service Running”, your instance is up and running and ready to connect!
6. Point your custom actions to your new service
The last step is to update your custom actions to point to your new instance address. In each of the custom actions that you’ve added to your DayBack environment, just change the value of the “serviceAlias” property in the config variable to the alias you specified earlier. Currently, it’s pointing to ‘https://daybackmeetings.now.sh‘ and you’ll just change it to ‘https://YourSpecifiedAlias.now.sh‘. Once that’s updated and you refresh DayBack, your custom actions will now be completely handled by your own private instance of the DayBack Meetings Service.
Leave a Reply